Pro8100 Menus
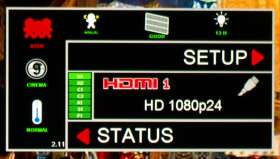
The Menu layout of the Pro8100, is definitely not a strength of this projector. While the menus are well endowed with features, the overall layout is both confusing, and slow to navigate. Further, most menu functions turn off very quickly, which is probably not a big problem for users once they are all set up and familiar with the menus, but it's quick enough to drive me crazy, as I try numerous different settings When you first hit Menu button (right), it shows your currently selected input (instead of the four items there in the image below). You can use the arrow keys to change input. To get into the main menus, though, you need to hit the right arrow key (thus the > next to Setup). In the image above, I had also hit the left arrow key, so you see various Status info around the left and top.
Pro8100 Menus
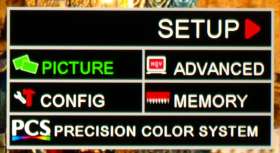
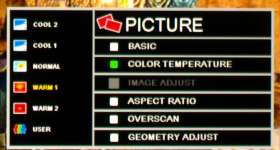
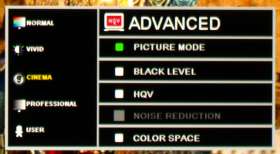
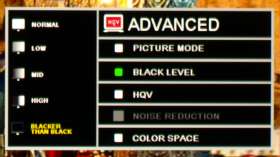
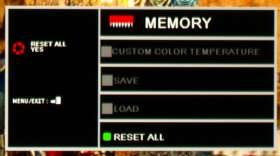
The Main menu (right) has five options, and even that is confusing in its layout, with two rows of two, plus their PCS (color management system) right below running across the full length of the menu. At first glance I didn't even think it was an active menu, just hype for their PCS, which they promote heavily in their brochures, etc. Once you have the main menu open (by pressing the Menu button on the remote or the projector), use your arrow keys to select one of the five choices (no, SETUP is not one of them): Picture, Config, Advanced, Memory, or PCS. The highlighted selection will be green. What the SETUP > is there for is to tell you how to enter the selected menu, and that is accomplished by hitting the right arrow key. Or once selected, you can hit Enter to proceed. Of the main menus, let's start with the Picture menu, shown here. Whichever item you scroll down to (Color Temp shown here), the small box highlights in green, and the choices display to the left. The Basic option (top, not highlighted) provides control of the, well, basic, stuff - brightness, contrast, saturation, sharpness... As you can see from the image above, there are five different color temp settings, plus the User adjustable one. Other options include Image Adjust (works only if you havce selected User), Aspect Ratio, Overscan, and Geometry (keystone...) The next main menu is the Config Menu, which controls a host of options. The first item is Projector Settings which controls Auto Power Down, Lamp brightness, the Daylight/night sensor, and front/rear/ceiling/table options. Menu display options, languages for the menus, Timers, the High Altitude fan mode, and Auto Iris Off/On are all there. Advanced lets you select your overall key image mode (Normal, Vivid, Cinema Professional, and User). Black level offers several options, including blacker than black, which I personally preferred over the others for movie watching), Noise controls (HQV), and choice of actual Color Space type or the Auto feature (auto is the way to go, unless you run into something really wierd). That takes us, next, to the Memory menu. It's very straightforward. (Finally!) You can reset the projector from here, and you can store and retrieve your preferred User settings. That takes us, last, to the PCS menu. Here you can select any of the primary or secondary colors (red/green/blue and cyan/yellow/magenta) and adjust their hue, and saturation. We do not adjust these for our calibrations, but I can comment that both the green and yellow colors could probably stand for a reduction in saturation. There is also a flesh tone adjustment option, edge enhancement, and a very nice gamma adjustment option. I found the gamma to be best at either 2.2 (theoretically the ideal), or at 2.0, for movie watching. Lastly, from the main menu, you can hit the left arrow key and get status on items such as lamp hours, Picture mode that is selected, selected color temp, etc. Bottom Line: It's all there, although the layout often seems illogical. Also the menu isn't conducive to comparing lower level choices. For example, if you are in Picture menu, and select Color Temperature, and hit Enter, you can now scroll between the six choices (cool 1, warm 1, normal, user, etc.). But to change from one to the other you need to hit Enter. Then, if you wanted to try still another one, you'll find that you are back on the main Picture menu's Color Temp box, and have to hit enter again to get back to the left to look at another one. Very inefficient, and slow. The good news is, once you are set up the way you want, you won't be using menus very much, and when you do need them, the remote does bypass much of the confusion. The short period that the lower level choices stay up, and the need to, when comparing modes to select, having to drop back a menu layer, then re-enter to change, makes fast comparisions of multiple choices near impossible.
Pro8100 User Memory Settings
There are User settings in the Color Temperature area (Picture menu), and Picture Mode (in the Advanced menu), and then you can save complete configurations in the Memory menu. The Pro8100 only supports two custom User settings. I think 3 should be the minimum and routinely favor having at least 5 or 6, so you can have different setups for different content (movies, sports, TV/HDTV, etc.) and different lighting conditions. Bottom Line: Not terrible, but definitely not ideal. Two just isn't enough. Even in the short time I've been using the projector, I've wished for a couple more "user slots" as Viewsonic calls them.
 Click Image to Enlarge
Pro8100 Projector Remote Control
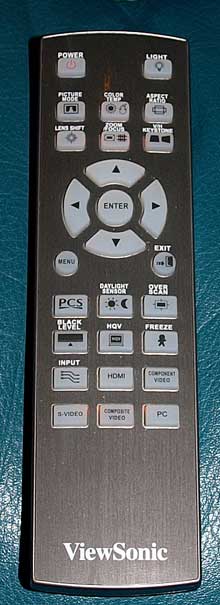
The remote control for the Pro8100 is a pretty typical remote control. Overall, I consider it to be a good one. Range is acceptable, buttons have decent spacing, and the backlight is bright enough (a complaint with many home theater remotes).
From the top: Left is the power button (once for on, twice for off), and across from it, the backlight button.
The next row of three is image related with Picture Mode (Cinema, etc.), Color Temp, and Aspect ratio buttons, that save you from navigating through the menus to get to those choices.
The next row of three control physical setup functions with the left most being the Lens shift control, the middle button lets you adjust focus and zoom (it's a toggle, when you first hit it, it is in focus mode, hit it again, and it's zoom...) To the right is the best avoided, keystone correction. Hey, you've got lens shift, so leave keystone alone, as it adds distortion to the image.
Below all of that are the arrow keys in the usual diamond layout, with a center Enter key, and below that to the left is the Menu button and the matching Exit button, to the right.
Further down are more direct button controls. The leftmost lets you enter PCS (their primary and secondary color control), where you can tune each color separately. The Daylight sensor, I really didn't work with. The right button is for the Overscan control for when you have noise along the top, bottom, left or right of the image. Using Overscan means giving up on pixel mapping (one pixel on the screen, for each pixel of data - no interpolation needed). Thus, as with any projector if you use the overscan control, you have a less precise image. Avoid it if you can. One thing I must note: My experience is, that when watching HD content on an HD channel, it is very uncommon to see such noise (usually at the top or bottom), which tends to look like a breaking up white line. With the Pro8100, however, I did see that a few times. With most projectors you are more likely to see that problem when viewing low def on a high def channel (ESPN sports clips from an original non-hd broadcast, or non-HD commercials, as well as SD-TV). Overscan, of course corrects it, but pays a small price. I'm not sure why the Pro8100 had some problems with pure HD broadcasts, but it was not a large percentage of the time.
The next row offers Black Level control access, and also noise control access (labeled HQV - as it is Silicon Optix' HQV processing being used). HQV processing is used on a fair number of home theater projectors, including Epson, and Optoma. There is also a Freeze image button on that row.
The last two rows provide access to the Input menu, or you can directly select the input you desire from the other five buttons on those two rows.
Bottom Line: A very good remote, its buttons are well spaced, so even those with large hands should have no difficulty. Overall, I have no real complaint!
 Click Image to Enlarge
Pro8100 Lens Throw and Lens Shift
As mentioned on the first page of this Pro8100 review, the zoom lens has a 1.6:1 aspect ratio. Measured from the screen to the front of the projector, the Pro8100 can be placed as close as 10 foot 3 inches, and as far back as 16 feet 6 inches.
The Pro8100 has the aspect ratios needed to support a 3rd party anamorphic lens, for those that wish to go with a 2.35:1 screen, for viewing Cinemascope movies without the black letterboxing at the top and bottom.
Review continues below this advertisement!
When it comes to lens shift, Viewsonic claims a +/- 75% range. Translated, that means the image bottom can be a half of a screen height above the lens, or the image top, a half screen height below the lens when the projector is mounted high, or anywhere in between. For more clarity, let's assume that 100" diagonal screen again. If mounting high, that means that the center of the lens can be about 24 inches above the top of the screen surface (not the screen frame). Overall, the Viewsonic has as much or more range than most other
Bottom Line: The zoom lens has a bit less range than most 3LCD and LCoS projectors, and more zoom range than any of the DLP projectors on the market. Like most of the 3LCD and LCoS projectors its closest, is about 10 feet, but many of the 3LCD and LCoS projectors sport 2:1 zooms, and therefore can be placed further back than the Viewsonic projector. With only 16 and a half feet maximum distance for a 100" screen, it is likely that a significant (but not overly large) percentage of folks planning to rear shelf mount, won't have enough range to place the projector on the back wall, especially if their room is particularly long, or they aren't going with a particularly large screen. For example, if you need to mount 20 feet back (22 foot room depth), and only want a 110" screen, the shelf would have to be about 3 feet deep, and a 100" screen would be impractical. Still, since this projector is being sold by local installing dealers, I expect the bulk of the Pro8100's will end up ceiling mounted.
Lens shift is more than adequate, with the projector able to be positioned anywhere from about 12 inches above the top of the screen surface, to about 12 inches below the bottom, for a 100" diagonal 16:9 screen
Pro8100 SDE and Rainbow Effect, Pixel Visibility
The projector uses 3LCD technology, so, of course there is no rainbow effect, since that is directly caused by using a spinning color filter wheel. As to SDE - screen door effect, today's 3LCD projectors, with 1080p resolution have a pixel structure that is just barely detectable on things like credits and graphics overlays (like the score areas when you are watching a football game). It's not severe enough to be a factor, unless you sit much, much closer than average. When filling my 128" diagonal Firehawk screen, and sitting at a closer than most 12 feet back (for that sized screen), it's a non-issue.
Pro8100 Projector Brightness
Best mode: Cinema Mode, with Color Temp set to Warm1, after adjustment, for best contrast, brightness and color, with lamp on full power, measured a most impressive 629 lumens with the zoom lens in the middle of its range. Interestingly, Cinema also produced the brightest settings when we went hunting for our preferred Brightest mode.
Brightest mode: Cinema Mode, with Color Temp set to Normal, after adjustment for best contrast, brightness and color - with the idea that some sacrifice in these areas, is necessary to get the brightest image, and be able to deal with some ambient light. With the zoom lens, again, in middle position, we measured 1281 lumens.
While the Pro8100 still comes up significantly short of the couple of "light cannons" out there (Optoma HD81-LV, and InFocus IN82), its best mode performance still makes it one of the brightest 1080p projectors around. For example, my JVC RS1, is considered very bright in best mode, and puts out just under 800 lumens. On the other hand, LCoS projectors usually have very little diference in brightness between Best, and Brightest modes, and my JVC only gains an extra 100 or so lumens. With the 3LCD projectors, most are in the 300 - 500 lumen range in best mode, but some will output over 1500 lumens, such as the Epson Home Cinema 1080 UB, which measured 1665 lumens.
Bottom Line: If movies and really dark rooms are your primary thing, the Viewsonic is very bright, and I really can only think of a couple of projectors below its price point, that can match or beat it. When it comes to brightest mode, however, the Viewsonic Pro8100 projector could best be described as average in brightness. Overall, lots of lumens for movie watching, and a healthy amount for TV, especially sports, with some room lighting!
Pro8100 Projector - Light Leakage
Definitely much better than most! Actually even with my white walls, no significant leakage was detected at all, through the lens, or from vents. (A rare thing).
Pro8100 Audible Noise Levels
The Viewsonic is very quiet in low lamp mode, claiming a record tying 18db. The projector also claims only 23db with lamp on full power, also a spectacular number. Just from what I hear in my two rooms, though, when working with the Viewsonic, I would guess that they are a little optimistic in low lamp mode, and, I suspect, that they are even more optimistic with the projector set for full power.
Bottom Line: Optimistic or not, the Viewsonic is very quiet. Perhaps their noise levels are actually 20db, and 27db respectively? Even if that was the case, the Viewsonic would still be one of the quietest of all home theater projectors.
In other words, audible noise is not an issue with the Viewsonic Pro8100 home theater projector, not even with the lamp in bright mode.
Pro8100 Projector Screen Recommendations
As black levels are very good for a 1080p projector, but still not a match for the best out there, I recommend, that if you are fanatic for black levels, a high contrast gray screen, such as the Firehawk, is probably ideal. I certainly found it worked great on mine. Lower cost alternatives to the Firehawk, include Elite's very inexpensive HC Gray screens, or, priced in the middle, perhaps Da-lite's HC CinemaVision surface. Most High Contrast gray surfaces have a gain below 1. The Firehawk, however claims 1.25 gain, and the Da-Lite, 1.1 gain.
Those less concerned with what are already good black levels, have the flexibility to choose the usual white surfaces. Matte white surfaces from most manufacturers will serve just fine. If you want some extra kick, though, consider a little gain, such as the Carada Brilliant White surface (Carada is only available in fixed wall screens - no motorized or pull-down types). Of course the Stewart Studiotek 130 must be mentioned, considering it is basically, the defacto standard out there. Da-Lite, Elite, and others also have white surface screens with some gain.
Pro8100 Projector Measurements and Calibration
Individual color settings for "best mode" were done in User 1, and "brightest mode" were done in User 2.
Best Mode: The calibrated version of Cinema mode, has Color Temp set to Warm1.
Brightest Mode: Calibrated version of Cinema mode has Color Temp set to Normal
Contrast=62
Brightness=54
Saturation=44
Hue=50
Black Level=Normal
Color Space=Auto
Lamp Mode=Normal (unless noted otherwise)
Auto Iris=Off
Daylight Sensor=Off
HQV:
Detail Enhance=5
Film Mode=Auto
LTI=Off
CTI=Off
User 1 Setup (used for "best mode", and used with Cinema/Warm1)
Gain R = 521, G = 342, B = 360
Offset R = 506, G = 512, B = 516
The end result measurements after our grayscale and other adjustments:
White (100 IRE): 6427K
Light gray (80 IRE): 6536K
Medium gray (50 IRE): 6576K
Low gray (30 IRE): 6637K
That's about as close as one can get to D65, and viewing movies on the projector after calibration, confirmed the color accuracy.
User 2 Setup (used for "brightest mode", and used with Cinema/Normal)
Gain R = 512, G = 466, B = 470
Offset R = 512, G = 512, B = 512
This provided us with a "brightest mode" image about twice as bright, and still offered a good overall quality image and acceptable color.
One more thing of note, green and yellow colors appear a little oversaturated. You can, however go into the PCS (color management system) and decrease the saturation of each color individually
Pro8100 Image Noise
Overall image noise was about average, a little less than most DLP projectors but not quite as clean as some others, despite using HQV's Reon image processing. There are a lot of noise reduction controls and I did play with them, but even with default settings, noise is not anything serious.

