Projector Reviews Images

ViewSonic PJD7828HDL Home Theater Projector Review - Hardware Tour

Posted on January 7, 2018 by Art Feierman

ViewSonic PJD7828HDL Home Theater Projector Review - Hardware Tour: Overview, The Lens, The Control Panel, The Input and Connector Panel, PJD7828HDL Lamp Life

Overview

The PJD7822HDL is smaller than most home projectors (and a bit better looking than many). On the other hand, it is pretty typical in size for a portable business projector.  It weighs in at a mere 5.3 pounds. While that’s not exactly featherweight, consider that most of the 600 to 1000 lumen portable LED projectors weight 2-4 pounds with their power bricks, and this Viewsonic is 3 to 5 times brighter.

Size wise, it’s just over 4 inches tall, and has a footprint of 12.4 inches by 9 inches, so a bit larger than a standard sheet of paper (8.5x11). In other words, nicely small and portable. An optional soft case is available.

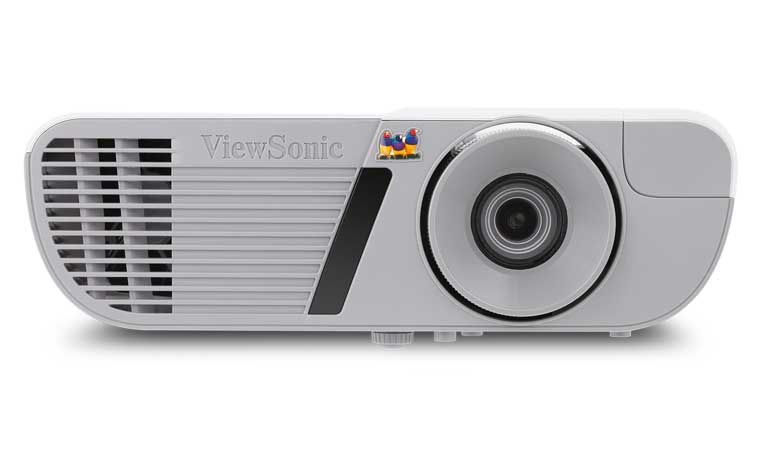
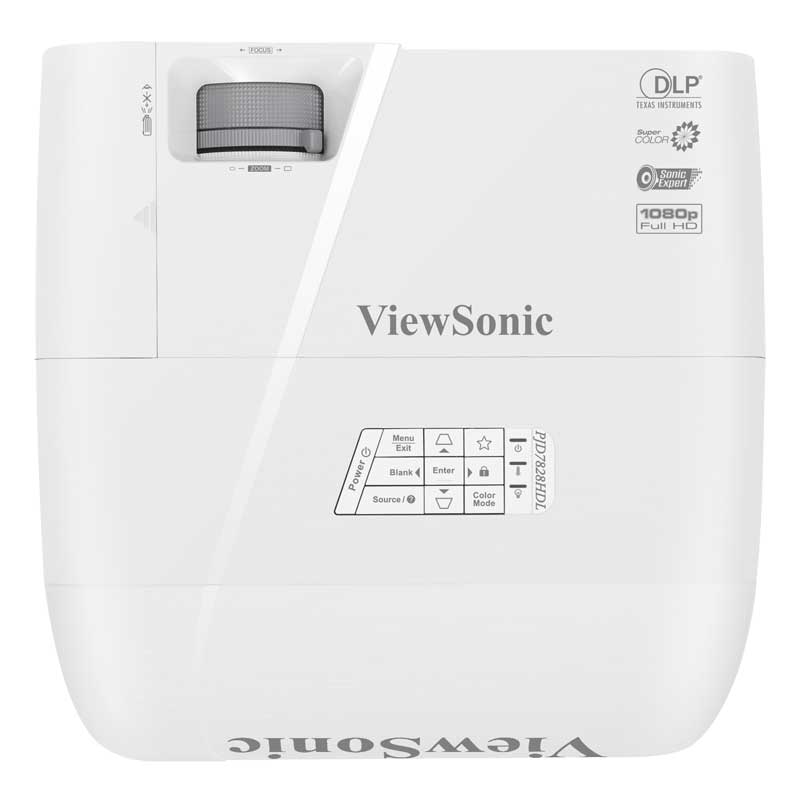
The manual zoom lens – 1.3:1 – is nicely recessed for protection and mounted off center, toward the right side (if facing the projector). The focus ring is, interestingly, adjustable from the front, or from the recessed area on the top, behind the lens. The zoom control is also in the recessed area on the top. There’s a large IR sensor area on the front, to the left of the lens. A single screw thread adjustable foot is on the bottom front, with two fixed feet on the back of the bottom on the left and right, for a stable 3 point stance.

The exhaust for the fan is on the front right and right side. Because of the short throw design, that awkwardly places the projector almost right next to my head (about 2 feet away), where I usually sit. I mention that, in that it could get a little toasty in my seat from the exhaust, so while watching this projector, I mostly move my seat closer to the screen than usual. Still, it doesn’t throw near as much heat, as, say, the Epson projector I haven ceiling mounted, which draws a good extra 100 watts at full power.

All the inputs and connectors are located on the back, as is typical of most projectors, however, the 2nd HDMI – with MHL, is hidden behind a door on the top right.

In terms of implementing the zoom and focus, Viewsonic does a mediocre job on the controls themselves. Adjusting the zoom screws up the focus, so you do a bit of back and forth until you have the right size, in focus. On most projectors, this doesn’t happen. Still, it’s hardly a big deal. Consider: How often does one adjust the zoom and focus? (As a reviewer – often). For most folks, it will just take a few extra seconds each time to set it up right, and a few extra seconds many times, if moving it from room to room.

The top also houses a door – right side – a small screw on the side needs to be removed to open the door. Within is the 2nd HDMI input, the one with MHL for mobile devices, including streaming sticks. This keeps the streaming stick safely out of sight.  That’s not likely to be an issue at home, but if this projector is used for business or education, hiding it makes sense for security.

On the top on the left side is the door for the lamp. A screw holds that secure and needs to be removed to change the lamp. That screw is on the left side near the top.

The Lens

Again, it is a manual 1.3:1 zoom, that is shorter throw than most. Focus and zoom can both be accomplished from the recessed area on the top of the projector. Overall, the optics seem typical for lower cost projectors. Focus is pretty good across the range, but if you are dead on sharp in the center, you will find the corners are a little soft.  That’s not surprising, especially since this is a short throw lens, which makes it harder to maintain focus across the entire screen.

Viewsonic lens
The short throw manual zoom lens performs well.

Overall, the image looks reasonably sharp, but no question that many more expensive projectors have better optics and a sharper overall image even if the same native resolution. That’s only fair. A company building a $2,500 projector can throw a lot more resources at designing a superior lens, than when the whole projector sells for under $600.

Best to focus about 1/3 of the way out between the center and the corner, which provides a nicely sharp image across the entire projected area. Also worth a mention is a very small amount of defocusing as the projector warms up. Again, this is hardly uncommon with today’s projectors, especially the sub-$1,000 ones (but not only them). Best solution if your setup is fairly permanent – power up, wait 15-20 minutes until the projector is fully warm, and focus. The amount of defocusing on this PJD7828HDL is very slight, so you are unlikely to notice that the image is less than super sharp when you first power up. More to the point, unless you bring up a menu or other text, you are unlikely to notice at all. Operative term: “very slight!”

I should mention that there is a bit of bowing a curvature to the top and bottom (in particular) of the image on the screen. Now there’s always some, but the Viewsonic has a bit more than most by virtue of being short throw in design.  Count that slight increase in bowing as a small price paid for the advantage of short throw.

The Control Panel

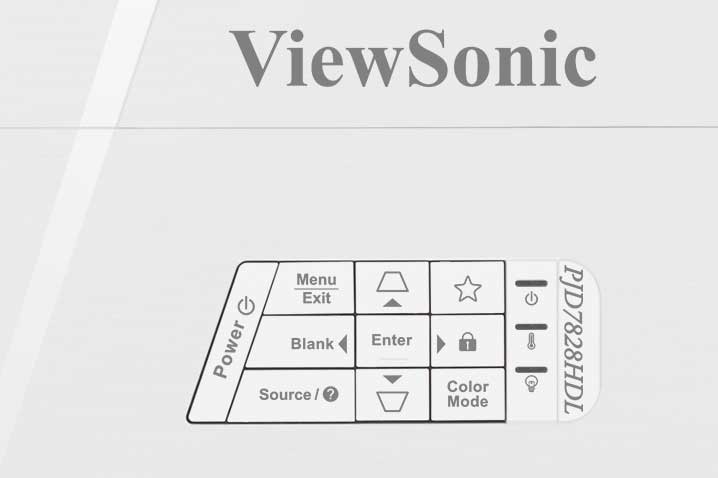
Located on the top near the back, and centered, is the PJD7828HDL’s control panel.  It has the Power button (once for on, twice for off) diagonally on the left side (if looking from the back).

control panel
The control panel has all the basics, plus a Favorite button and a Color mode menu shortcut

Next to it are three rows of three buttons. From the top left is the Menu button, then, moving to the right, is the up arrow button which doubles as keystone adjustment control when not navigating the menus. On the top right is the My Button (with a star icon). You can choose what you want that to control, from the menus.

The second row starts with the left arrow, then the Enter button and the right arrow.  The left and right arrows, double respectively as Blank (the image), and lock the control panel.

The bottom three consist of Source (inputs) on the right, down arrow (and keystone correction) in the center, and Color Mode on the right (a nice touch to find on a control panel).

Three indicator lights – the usual Power, Temp, and Lamp are on the right side of the control panel. As is typical, there are various flashing patterns to advise you of the status of the projector. The User guide describes the various functions.

The Input and Connector Panel

Overall, the PJD7828HDL has a pretty typical selection of inputs and connectors for a small business or education projector. As I mentioned earlier, it does have a few items that we don’t normally see on most home projectors anymore.

Let’s start on the left, and let’s also not forget that the 2nd HDMI – the one with MHL is found separately in that hidden compartment:

input panel
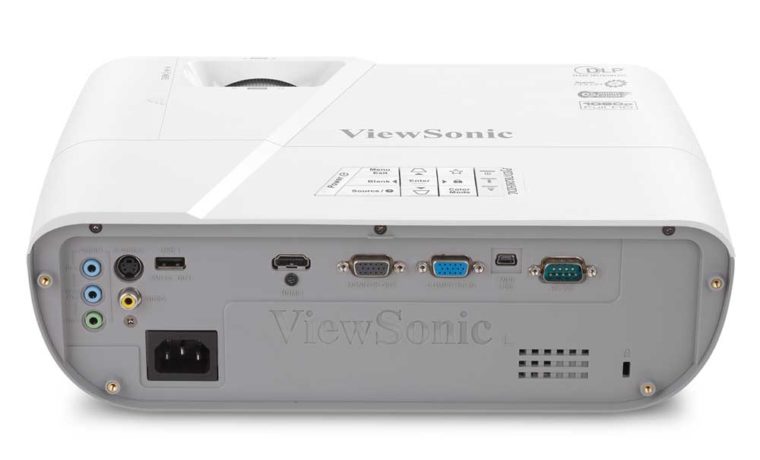
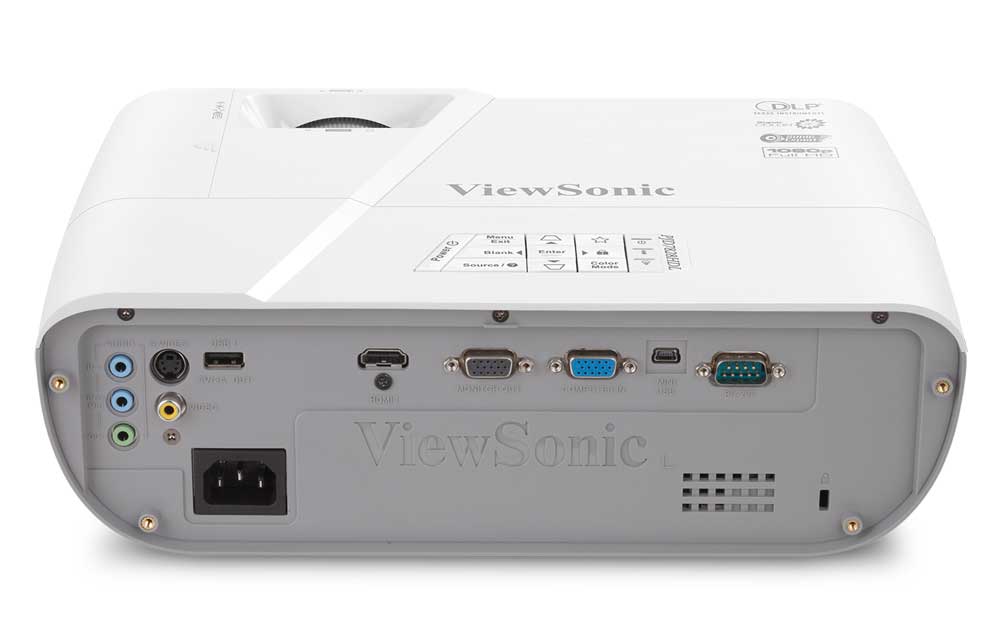
The back of the PJD7828HDL shows one of two HDMI inputs, as well as computer in/out, audio in/out, two USBs and more.

First up are Audio Inputs – there are a pair of stereo audio inputs, but the second one (below the first) can alternately be used as a microphone input – that is controlled in the menus. Below that one is a stereo audio output. If you put a jack into the audio output, that will shut down the internal 10 watt speaker (unfortunately – best if you have the option of running either, or both). Still, that’s normal. I’ve been “yelling” for projectors with speakers and audio outs to have the option of using both, as that would be most helpful. Consider, at home, one could use the internal speaker system, and enhance by feeding a powered sub-woofer with the audio out.

Moving to the right next up are S-Video and composite video (which support Closed Captioning). These days, we don’t find these controls often on home projectors, but as many business and education projectors may be replacing older models still hooked up to “legacy” sources – like DVRs – they are still common on non-home projectors.  Since the PJD7828HDL serves all three markets, no surprise they are found here.

Next comes the first of two USBs. This one has 5 Volt, 2Amp power, so it can be used as a power source for various needs, including charging 3D glasses (or a smartphone, tablet or mobile device that needs external power).

After a space comes the HDMI input (remember the other one). After that, the Monitor Out (discussed on the Special Features page, and matching analog computer VGA input). Note that the monitor out only works with the VGA input, not HDMI sources…

Second from the right is a mini-USB, and finally, a traditional RS-232 serial port for “old school” command and control of the projector from a computer system.

That’s everything on the back, except the power connector for AC, and a Kensington lock slot on the lower right (a security bar is on the bottom right side).

That, folks, pretty much covers the projector’s hardware features.

PJD7828HDL Lamp Life

Pretty impressive, Viewsonic claims 4,000 hours at full power, which is better than most. In its maximum ECO settings, Viewsonic claims 10,000 hours, which is as good as it gets. Please understand, to get to that 10,000 hours, assume that projectors are mostly powering down when they see no activity. If they were merely set to shut off, then the maximum hours would be shorter. Having an extremely long life using such techniques is clever, but does not indicate how long the projector will run in most efficient mode assuming that the content is always active.

Still, with the low cost replacement lamp (typically $99), I don’t think anyone’s going to complain, if under real use, the Viewsonic lamp lasts only 7,000 or 8,000 hours in ECO mode!

Bottom line – lamp life is about as good as it gets, and with a $99 street price on the lamp ($129 on Viewsonic’s own store site), that’s super competitive price-wise with the other lowest cost lamps, and half of the price of many competitors for their replacement lamps. By the way, Viewsonic warrants the lamp for 1 year, longer than some companies that still only offer 90 days.

ViewSonic PJD7828HDL Home Theater Projector Review - Hardware Tour: Overview, The Lens, The Control Panel, The Input and Connector Panel, PJD7828HDL Lamp Life

Overview

The PJD7822HDL is smaller than most home projectors (and a bit better looking than many). On the other hand, it is pretty typical in size for a portable business projector.  It weighs in at a mere 5.3 pounds. While that’s not exactly featherweight, consider that most of the 600 to 1000 lumen portable LED projectors weight 2-4 pounds with their power bricks, and this Viewsonic is 3 to 5 times brighter.

Size wise, it’s just over 4 inches tall, and has a footprint of 12.4 inches by 9 inches, so a bit larger than a standard sheet of paper (8.5x11). In other words, nicely small and portable. An optional soft case is available.

The manual zoom lens – 1.3:1 – is nicely recessed for protection and mounted off center, toward the right side (if facing the projector). The focus ring is, interestingly, adjustable from the front, or from the recessed area on the top, behind the lens. The zoom control is also in the recessed area on the top. There’s a large IR sensor area on the front, to the left of the lens. A single screw thread adjustable foot is on the bottom front, with two fixed feet on the back of the bottom on the left and right, for a stable 3 point stance.

The exhaust for the fan is on the front right and right side. Because of the short throw design, that awkwardly places the projector almost right next to my head (about 2 feet away), where I usually sit. I mention that, in that it could get a little toasty in my seat from the exhaust, so while watching this projector, I mostly move my seat closer to the screen than usual. Still, it doesn’t throw near as much heat, as, say, the Epson projector I haven ceiling mounted, which draws a good extra 100 watts at full power.

All the inputs and connectors are located on the back, as is typical of most projectors, however, the 2nd HDMI – with MHL, is hidden behind a door on the top right.

In terms of implementing the zoom and focus, Viewsonic does a mediocre job on the controls themselves. Adjusting the zoom screws up the focus, so you do a bit of back and forth until you have the right size, in focus. On most projectors, this doesn’t happen. Still, it’s hardly a big deal. Consider: How often does one adjust the zoom and focus? (As a reviewer – often). For most folks, it will just take a few extra seconds each time to set it up right, and a few extra seconds many times, if moving it from room to room.

The top also houses a door – right side – a small screw on the side needs to be removed to open the door. Within is the 2nd HDMI input, the one with MHL for mobile devices, including streaming sticks. This keeps the streaming stick safely out of sight.  That’s not likely to be an issue at home, but if this projector is used for business or education, hiding it makes sense for security.

On the top on the left side is the door for the lamp. A screw holds that secure and needs to be removed to change the lamp. That screw is on the left side near the top.
The Lens

Again, it is a manual 1.3:1 zoom, that is shorter throw than most. Focus and zoom can both be accomplished from the recessed area on the top of the projector. Overall, the optics seem typical for lower cost projectors. Focus is pretty good across the range, but if you are dead on sharp in the center, you will find the corners are a little soft.  That’s not surprising, especially since this is a short throw lens, which makes it harder to maintain focus across the entire screen.

Viewsonic lens
The short throw manual zoom lens performs well.

Overall, the image looks reasonably sharp, but no question that many more expensive projectors have better optics and a sharper overall image even if the same native resolution. That’s only fair. A company building a $2,500 projector can throw a lot more resources at designing a superior lens, than when the whole projector sells for under $600.

Best to focus about 1/3 of the way out between the center and the corner, which provides a nicely sharp image across the entire projected area. Also worth a mention is a very small amount of defocusing as the projector warms up. Again, this is hardly uncommon with today’s projectors, especially the sub-$1,000 ones (but not only them). Best solution if your setup is fairly permanent – power up, wait 15-20 minutes until the projector is fully warm, and focus. The amount of defocusing on this PJD7828HDL is very slight, so you are unlikely to notice that the image is less than super sharp when you first power up. More to the point, unless you bring up a menu or other text, you are unlikely to notice at all. Operative term: “very slight!”

I should mention that there is a bit of bowing a curvature to the top and bottom (in particular) of the image on the screen. Now there’s always some, but the Viewsonic has a bit more than most by virtue of being short throw in design.  Count that slight increase in bowing as a small price paid for the advantage of short throw.

The Control Panel

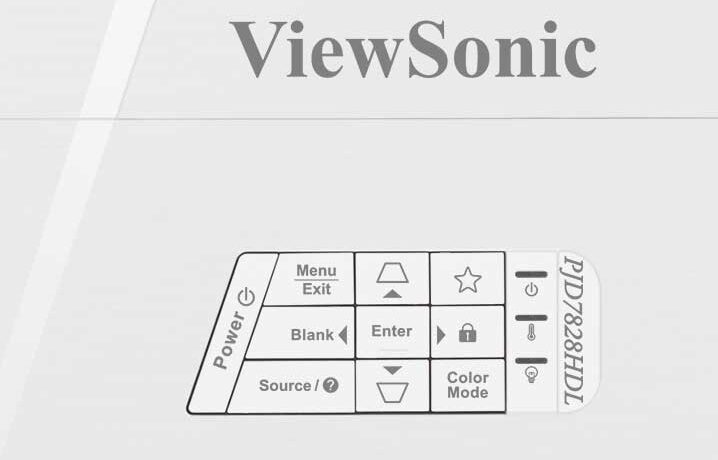
Located on the top near the back, and centered, is the PJD7828HDL’s control panel.  It has the Power button (once for on, twice for off) diagonally on the left side (if looking from the back).

control panel
The control panel has all the basics, plus a Favorite button and a Color mode menu shortcut

Next to it are three rows of three buttons. From the top left is the Menu button, then, moving to the right, is the up arrow button which doubles as keystone adjustment control when not navigating the menus. On the top right is the My Button (with a star icon). You can choose what you want that to control, from the menus.

The second row starts with the left arrow, then the Enter button and the right arrow.  The left and right arrows, double respectively as Blank (the image), and lock the control panel.

The bottom three consist of Source (inputs) on the right, down arrow (and keystone correction) in the center, and Color Mode on the right (a nice touch to find on a control panel).

Three indicator lights – the usual Power, Temp, and Lamp are on the right side of the control panel. As is typical, there are various flashing patterns to advise you of the status of the projector. The User guide describes the various functions.

The Input and Connector Panel

Overall, the PJD7828HDL has a pretty typical selection of inputs and connectors for a small business or education projector. As I mentioned earlier, it does have a few items that we don’t normally see on most home projectors anymore.

Let’s start on the left, and let’s also not forget that the 2nd HDMI – the one with MHL is found separately in that hidden compartment:

input panel
The back of the PJD7828HDL shows one of two HDMI inputs, as well as computer in/out, audio in/out, two USBs and more.

First up are Audio Inputs – there are a pair of stereo audio inputs, but the second one (below the first) can alternately be used as a microphone input – that is controlled in the menus. Below that one is a stereo audio output. If you put a jack into the audio output, that will shut down the internal 10 watt speaker (unfortunately – best if you have the option of running either, or both). Still, that’s normal. I’ve been “yelling” for projectors with speakers and audio outs to have the option of using both, as that would be most helpful. Consider, at home, one could use the internal speaker system, and enhance by feeding a powered sub-woofer with the audio out.

Moving to the right next up are S-Video and composite video (which support Closed Captioning). These days, we don’t find these controls often on home projectors, but as many business and education projectors may be replacing older models still hooked up to “legacy” sources – like DVRs – they are still common on non-home projectors.  Since the PJD7828HDL serves all three markets, no surprise they are found here.

Next comes the first of two USBs. This one has 5 Volt, 2Amp power, so it can be used as a power source for various needs, including charging 3D glasses (or a smartphone, tablet or mobile device that needs external power).

After a space comes the HDMI input (remember the other one). After that, the Monitor Out (discussed on the Special Features page, and matching analog computer VGA input). Note that the monitor out only works with the VGA input, not HDMI sources…

Second from the right is a mini-USB, and finally, a traditional RS-232 serial port for “old school” command and control of the projector from a computer system.

That’s everything on the back, except the power connector for AC, and a Kensington lock slot on the lower right (a security bar is on the bottom right side).

That, folks, pretty much covers the projector’s hardware features.

PJD7828HDL Lamp Life

Pretty impressive, Viewsonic claims 4,000 hours at full power, which is better than most. In its maximum ECO settings, Viewsonic claims 10,000 hours, which is as good as it gets. Please understand, to get to that 10,000 hours, assume that projectors are mostly powering down when they see no activity. If they were merely set to shut off, then the maximum hours would be shorter. Having an extremely long life using such techniques is clever, but does not indicate how long the projector will run in most efficient mode assuming that the content is always active.

Still, with the low cost replacement lamp (typically $99), I don’t think anyone’s going to complain, if under real use, the Viewsonic lamp lasts only 7,000 or 8,000 hours in ECO mode!

Bottom line – lamp life is about as good as it gets, and with a $99 street price on the lamp ($129 on Viewsonic’s own store site), that’s super competitive price-wise with the other lowest cost lamps, and half of the price of many competitors for their replacement lamps. By the way, Viewsonic warrants the lamp for 1 year, longer than some companies that still only offer 90 days.

© 2024 Projector Reviews

crossmenu linkedin facebook pinterest youtube rss twitter instagram facebook-blank rss-blank linkedin-blank pinterest youtube twitter instagram