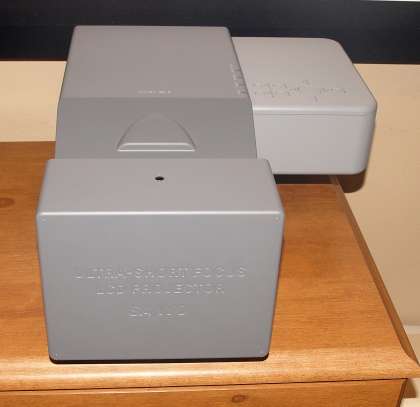
What a strange looking projector. I'm not sure what, exactly it looks like, but it sure is different. I normally like to say - starting from the front, and expect to start talking about the lens. In this case, the lens is not in the front, in fact, nothing is in the front - as the front is almost against the wall the screen is on.
So, let's start with an image of the projector:
Looking from the back (also blank), the controls are on the left side, while the control panel is on the top of the area that extends out to the right of the projector.
Light comes out of the window of the back part of the projector, on the "front" side of that section, where the case of the projector forms a V (from front to back).
The Sanyo PLC-XL50 does not have a zoom lens, but does have the ability to use a modest amount of digital zoom to change the size of the image. Primarily though, moving the projector a couple of inches one way or another is the preferred method of adjusting to different sized screens/image size. The lens is described by Sanyo as a "large diameter aspheric (non-spherical) lens" working in conjunction with an aspheric mirror and and a new optical engine. Bottom line - it works as advertised!
The projector does not offer lens shift, but does have keystone correction if needed.
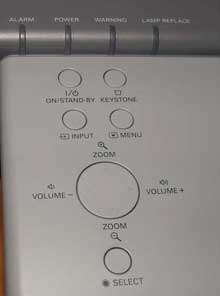
Let's start with the control panel. Interestingly the control panel is laid out, and labeled, to be read easily when standing along side the projector to its right (the right, if looking from the back).
At the top of the control panel is the power button, and next to it, the Keystone correction button. On the next row are the Input select, and the Menu button. Below that, is a disc pad with four arrow keys, and finally, below that, the Select (enter) button. The arrow keys double as digital zoom in/out (up and down arrows), and the left and right arrows control speaker volume. On the main body of the projector, just "above" the control panel, are four indicator lights: Alarm, Power, Warning, and Lamp.
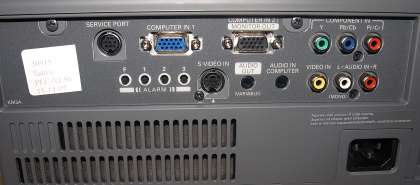
On the side opposite, are the input controls. From the top left, to top right:
RS-232 for command and control, Computer 1 input, Computer 2 input (can be changed to a monitor out, via menu control), and component video input (three color coded RCA jacks). The computer 1 input can, instead of supporting a traditional analog computer input, also work with a SCART or RGB (component) source.
On the second row, there are four buttons for the built in alarm system (more on that later), the obilgatory S-Video and composite video inputs, Stereo audio input (stereo mini-jack) for a computer source, a pair of RCA jacks for audio input from a video source, and an Audio output to drive powered speakers, or audio switching. The power receptacle is located below the other inputs, toward the right.
Just to the right of the inputs is a small, recessed slide for image focus.
On the top of the projector about 3 inches forward of the back, is a small "bump" which is the infra-red sensor for the remote control.
That, folks, is all there is to the XL50, except to say that there are different ways to mount. The image shows the attachable feet that would be used for normal tabletop setup, although the projector can be mounted upside down, or vertically, as needed.
The next question becomes - how is the overall image quality, considering the unique design of the Sanyo PLC-XL50. We discuss many aspects of image quality,


