Projector Reviews Images

Optoma HD806 - Physical Tour-2

Posted on December 15, 2008 by Art Feierman

Optoma HD806 Menus

Again, the Optoma HD806 takes its cues from the other HD80xx projectors.

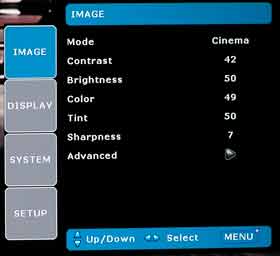
The main image menu is first, and shown to the left.

The Modes include Cinema, Bright, TV, sRGB, and a User defined mode.

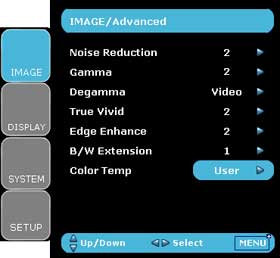
The Advanced option on this menu takes you to a second screen, which is shown below.

The Advanced menu features noise reduction control, gamma adjustment, the degamma modes including Film, Video Graphics and PC. True Vivid mode can boost the dynamics of the image, but can easily be over the top.

There are also controls for Edge Enhancement, and for stretching the black and white levels for more contrast.

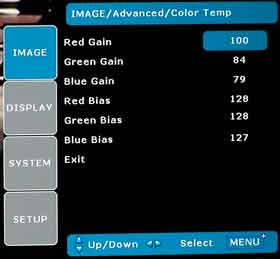
The Color Temp area for calibration is found here, and you set the the individual color settings when in the Color Temp User mode. Selecting Color Temp, brings up this menu at the bottom of the screen.

Selecting User, brings up the individual color settings shown here.

Please note, none of the settings you see in the menu images reflect our post calibration settings that are found in the calibration section of this review.

The other main menus on the HD806 include Display, which has aspect ratio, Overscan control, for "overscanning" - zooming in slightly on the image to eliminate image noise that sometimes appears at the edges of TV and HDTV source material. There is also a separate edge mask, which, unlike overscan, still maintains 1:1 pixel matching, so using edge masking actually gets rid of those outside lines, by cropping the image slightly smaller.

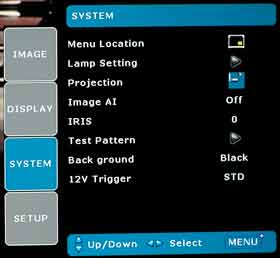
The System Menu, has a variety of features, including where you want the menus positioned. and the projector's orientation (front rear, ceiling, table). From a performance standpoint, however, it also contains the Lamp settings - Bright Mode, on or off. If, however, you have Image AI engaged, the Bright Mode choice is not present.

HD80 HD8000 menu image

HD806 menu advanced

HD80 HD8000 menu image adv Ctemp

HD80 HD8000 menu image adv Ct Ct

HD80 HD8000 menu system

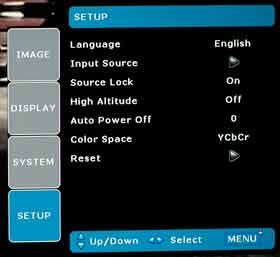
HD80 HD8000 menu setup

The Iris control is also on this menu, giving you a choice of Auto, or manual (on manual, you can dial down the 17 step iris to the desired brightness). You will find our brightness measurements for 0 (wide open), 8, and 16 settings, in the section on Projector Brightness. The control for the 12 volt screen trigger is also on this menu.

The last menu is the Setup Menu, which contains choice of menu languages, Input Source, Source Lock (whether you want the projector to scan inputs to find a live one, or just come up pointing to the last source selected). Also on Setup are High Altitude mode, an Auto Power Off setting (projector automatically powers down if no source present), and a projector Reset.

Overall, the menu structure is pretty good. I favor having things like lamp controls and dynamic iris on the same menu as all the image controls, but few put it there. Navigating is quick. For some features you do end up going down three levels (to get to the individual color settings, for example). I've seen a lot worse, and while I like a few better, it's far closer to the best, than the worst. Not bad at all!

Optoma HD806 Remote Control

Click to enlarge. SO close

Optoma provides the same remote control used in the other HD80xx series projectors. The remote has very good range, which surprised me as I was not impressed with its range on previous models. Perhaps it has been improved or the IR sensor on the projector is more sensitive. The backlight comes on by pressing any key. It is a yellow green in color, and very easy to read.

Here's a quick rundown on the button layout:

Top left, all alone is the Off/On switch (press once for on, and two for off). Next come six buttons that provide direct control for Brightness, Contrast, Image-AI off on, Iris control Gamma, and Brite mode.

Right below them, are the Image Shift up and down buttons. For those not familiar, this allows you to move the image up or down the screen digitally. Consider: You are watching a typical movie with a lettter box at top and bottom on your 16:9 screen. With Image Shift, you could move the movie down so that the bottom of the actual movie is flush with the bottom of the screen, instead of being 6 - 10 inches above. This would give you double the letterbox at the top, but some will like this trick.

Then comes the classic arrow key configuration with a center Enter button. Just below on the right, is the Menu Button, and the Preset mode button is opposite on the right.

Overscan and Edge masking are just below.

After some space, you get four buttons for different aspect ratios. And lastly, six buttons for the six HD806 inputs!

The layout overall is good, but I find the menu button, even though easy to find by feel, to be very small and wedged between the arrow keys and the Overscan button. My guess is that Optoma doesn't expect consumers to spend much time in the menus, with so many direct access buttons above. For me, though, I'm constantly in the menus, while reviewing, and it was a little frustrating.

Click Image to Enlarge

© 2024 Projector Reviews

crossmenu linkedin facebook pinterest youtube rss twitter instagram facebook-blank rss-blank linkedin-blank pinterest youtube twitter instagram