Main Image/Picture Menu
Pretty typical. Calibration controls are in the Advanced sub-menu
The HD131Xe menus are nicely laid out. I have but one complaint: Two of the menus are only partially visible in that there are additional menu items if you scroll down to the last item showing, and keep scrolling.
There's only a tiny little down pointing triangle, so many folks might miss that. If you do miss it, you'll be wondering, for example, how to change the projector from Bright Lamp to Eco.
I've dropped most of the menus into this player, adding a sentence here and there as a caption to point out a few things.
No surprises on the back panel Looking at the inputs and connectors starting at the left:
There are two HDMI 1.4 connectors, compatible with all the usual 3D modes including Blu-ray 3D. Next over is the basic composite video input, for your lower level game machine, other sources without advanced resolution. Next comes a single HD15 connector for either an analog computer input (you know, the standard, for decades), or for a component video input.
Next over to the right, but lower is a similar connector, this time a DB9, for a serial port used for the usual "command and control" type room systems.
That's followed by three mini audio connectors: Two different audio inputs (one for "video" sources, the other for computer sources), and an audio output, which could come in very handy if you travel with this projector, and get a chance to plug into a bigger sound system to fill larger rooms than the 10 watt speaker can handle.
Finally, (other than the Kensington lock, power receptacle, and the security bar), is a Din connector for the optional 3D emitter.
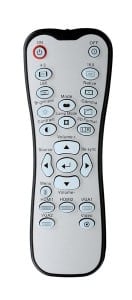
 Optoma's remote is a good one. It's range isn't bad, but it is a bit more finicky than some (you'll have to point a little better than with some more powerful remotes, if you are bouncing the remote control's signal off of your screen, to the projector).
The layout is good, it's light, the buttons are mostly very small, but the spacing is good.
Strange as it sounds, my only real complaint is that the bright LED back light is downright blinding if you have fully darkened your room. That makes it tough if you are playing around and want to adjust the color. Well, if that's the worst thing, then we're in good shape.
Let's run though the organization of this remote, from the top right.
Which means we start with the Power button, (once on, twice to power down), and across from it, the backlight button. Note, though, that pressing any button lights up the backlight, which stays on for about 5 seconds. Next up are two rows with four total aspect ratios.
Underneath them, in the center is a icon that looks sort of like Mickey Mouse ears, but brings up the Display menu, with the various Picture modes. I presume the "ears" are supposed to be the top of an old film projector with its reels.
Right below it is a button for switching the projector from Bright, to Eco mode.
The next four buttons give you direct access to other controls, including:
Brightness, Contrast, Gamma, and the L/R invert for 3D glasses.
That takes us to the navigation controls, which as noted earlier is slightly different than on the control panel. This time the arrow keys are still in a round formation, and work the same when the menus are up, but when they are off, the up and down arrows double as volume up and down, not keystone correction. The left arrow will move you through your Source options
That leaves us the bottom section. The Menu button itself is below and to the left of the navigation ring, while the remaining five buttons let you jump directly to your desired source.
Easy enough!
| Lens Placement | ||
|---|---|---|
| Closest | Furthest | |
| Lens Throw | 10.89 feet | 13.07 feet |
| Lens Above Top of Screen | Below Bottom | |
| Lens shift (offset) | 8 inches | 8 inches |
OK, the zoom range is rather limited, as is typical in this price range, but as you can see from the chart, for a 100" screen the front of the lens can be be anywhere from about 10 feet 11 inches from the screen or as far back as about 13 feet 1 inch.
When it comes to vertical placement, to avoid using keystone correction (always a good idea, if you want the best picture), the projector will sit on a table, with the center of the lens about 8 inches below the bottom of the screen surface of a 100" screen.
Conversely, if ceiling mounting this projector, the center of the lens would be about 8 inches above the top of the screen surface, for the same sized screen. If your screen is 20% larger, for example, than to figure out your lens throw and height placement, just multiply these numbers by 1.2 (120%). It's that easy.