HC7900DW Menus
Mitsubishi HC7900DW uses the same menu structure Mitsubishi has been using for many, many years. It gets the job done, however it is laid out a bit differently than most of us are used to. In fact, if anything, it resembles a couple of the higher end European projector menu layouts, but I'm still not saying that's a great thing. Unlike most menu systems of home-theater projectors, the Mitsubishi doesn't really give you a completely integrated set of presets such as cinema, video, sports.
It really isn't my favorite menu layout, but that may be primarily because it is laid out differently than most. I spend a lot of time going through menus as a reviewer, so I tend to be both critical, and picky.
As mentioned elsewhere, you cannot change the basic settings of modes like Cinema, so you go to one of the three AV Memories, and create the settings you want. If what you want is an adjusted "Cinema mode", no problem, just specify that you are starting your AV memory using the Cinema preset as a starting point.
With both 2D and 3D available, though, having more than just 3 User memories would be better.
HC7900DW Menu Slideshow
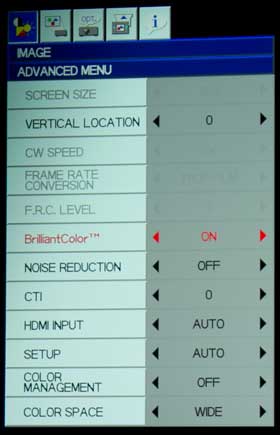
Image menu's Advanced menu
Installation menu
The Installation menu, including lamp brightness, projector positioning (front rear, ceiling, table), standby, and other features.
![]()
Feature menu
The feature menu, is mostly items relating to displaying menus, setting the IR receiver, and menu language, but it also offers control of aspect ratio, and there's a Password feature for you if you want to lock those kids out of adjusting things!
Signal menu
The Signal menu, deals first with horizontal and vertical positioning of the image, electronically. That, sync and tracking controls are primarily for working with analog computer signals. Also present is an overscan control, if your source material results in some noise around the edge of the image. Again, personally I favor edge masking to using overscan. Edge masking lets you choose a slightly smaller image by simply not projecting the noisy outer edge of the image. Overscan magnifies everything, so when projected, that outer edge is "off the screen", and you are

The thing is, edge masking maintains 1:1 pixel mapping for best precision and sharpness. But the image is a touch undersized. Overscan is softer, but continues to fill your screen. That's a bit of an oversimplification, but should help!
The thing is, edge masking maintains 1:1 pixel mapping for best precision and sharpness. But the image is a touch undersized. Overscan is softer, but continues to fill your screen. That's a bit of an oversimplification, but should help!
Information menu
Finally, there's an information menu. Nothing you can adjust here, but it lets you know some of what's going on.
Mitsubishi HC7900DW Remote
Mitsubishi HC7900 remote control is the same as last year's, and it remains one of my least favorite. Range is okay, however this is a really old design type of remote, in fact I have been complaining about it for years on a number of previous Mitsubishi projectors.
Don't get me wrong. There's nothing really terribly wrong with this remote. To me, though, it looks and feels dated, and the backlight is dim enough to be of little use. Also, I don't particularly like the feel of the buttons (picky, picky). I find the buttons to be a little soft. Nonetheless, this remote will get the job done. Range seems about average. I've been able to use the projector with bouncing the signal off of my screen from a distance of up to about 25 feet if I'm pointing pretty precisely. This should not be a problem for most of us. If it is a problem for you, you now have a great excuse for going out and buying a first class universal remote to control all your gear.
Mitsubishi HC7900DW Lens Throw
The HC7900DW offers a 1.5:1 zoom ratio.
To fill the usual 100" 16:9 diagonal screen, the front of the projector can be as close as 10.17 feet from the screen, or as far back as 15.1 feet. That's pretty typical.
Mitsubishi HC7900 Lens Shift
The Mitsubishi HC7900 just like last year's HC7800, as noted, has vertical lens shift and lacks the less critical horizontal lens shift. Most folks are primarily concerned with vertical. And the Mitsubishi has that covered nicely. With the adjustments, you've got reasonable top-to-bottom placement range, as opposed to many of the DLP competition which lack lens shift, having fixed lens offset. You are at the mercy of that offset when you are determining if the projector will work in your room. Now, this won't be an issue for you, if you choose the HC7900, but this is so you have an understanding of why you want lens shift. Our example: Many of the DLP competitors that lack lens shift, need to be mounted so their lens is about 15-20 inches above the top of your screen surface, if you want a 110-inch screen. If your room has 8-foot ceilings, guess what? Mounting close as possible to the ceiling a projector lens is still likely to be almost 10 inches down. For a 110" screen, that's 10 inches down to the center of the lens, and another 20 more inches to the top of the screen. Your ceiling is 96 inches high, so the top of screen is going to be at about 66 inches off the floor.
Since a 110 inch diagonal screen is 55 inches tall, the bottom of the screen is going to be just about a foot off the floor. Now it's going to be really tough for your second row of viewers to see the lower half of the screen. That's why lens shift is great, you get some flexibility instead. Well, this Mitsubishi HC7900DW has lens shift. Life is good, or at least better.
With lens shift, no problem, you could, if desired have the screen top flush with the ceiling if you chose.
Anamorphic Lens - Wide Screen
Yes, the Mitsubishi HC7900DW supports an anamorphic lens. Not only does it support using one in 2D, but Mitsubishi also claims to support the use of an anamorphic lens with 3D. That's not something most manufacturers mention, and at least a couple of projectors cannot do (3D with an anamorphic lens).

