Projector Reviews Images

JVC DLA-HD250 Physical Tour 2

Posted on October 3, 2013 by Art Feierman

JVC DLA-HD250 Menus

VC has a very well designed menu structure. The HD250's menus are essentially identical to the ones I'm used to from years of watching my JVCs. The more expensive current JVC's offer CFI, creative frame interpolation, so have an extra menu item. Neither my old RS20, nor the HD250 and HD250Pro offer CFI, which is too bad, as many like CFI, especially for sports.

The HD250's menus are not quite identical to the more expensive JVC projectors. The differences center around two areas.

First, the DLA-HD250 projector lacks the pre-calibrated THX mode found on the RS25 and RS35.

JVC DLA-HD250 Menus

JVC DLA-HD250 Menus

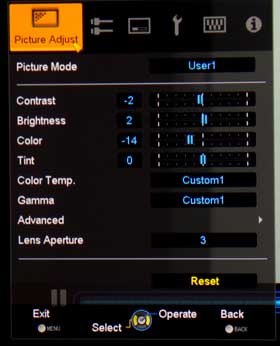
Picture Mode

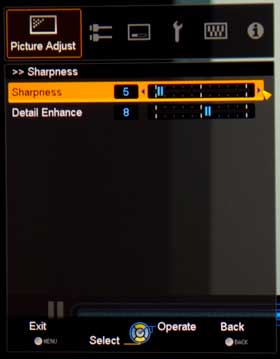
Sharpness

Pixed Adjust

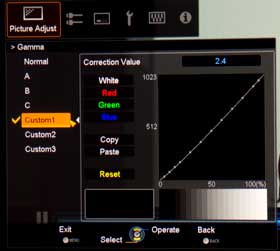
Gamma

Secondly, it lacks a full CMS to calibrate primary and secondary colors. One of the incentives JVC gives you to move up to the more expensive models, is the more sophisticated controls that allow to further perfect an already impressive color handling ability.

Most of the image goodies are found on the Picture menu, which is the first main menu in the top right when the main menu is open.

Besides the usual Brightness, Contrast, Color Saturation, etc., the Picture menu has a Gamma sub menu, and Advanced sub-menu which has sharpness and detail enhancement (keep them low).

The Pixel Adjust menu allows the JVC to digitally shift the red, green, or blue, data by one pixel up/down/left/right. This means that if a JVC projector has any pixel misalignment greater than 1/2 pixel diameter (it can be corrected to less than that).

This menu is the Color Temp menu for doing the basic grayscale adjustments. It's the same standard set of controls found on the more expensive JVC projectors. Note, you can save up to three custom color temp settings.

Our final menu is the gamma control menu, which is extremely flexible.

Not only can you adjust the gamma of white, but also you can do each primary color separately. Further, the JVC HD250 comes with Normal, and 3 additional gamma presets, plus it allows you to save three of your own custom settings. Note also, that when doing so you can adjust each IRE point separately, and separate gamma controls for the primary colors as well as white.

I also like the grayscale provided on the screen, which gives you a good idea if you are crushing blacks or whites too much, or expanding them the way you want. A great Gamma control.

JVC DLA-HD250 Remote Control

Bummer! I own the "old" JVC DLA-RS20 which comes with the same remote control as the HD250 and HD250Pro come with. I never was satisfied with the range on the remote, and I'm still not! JVC upgraded the remote to all their models when they brought out the RS15, RS25, and RS35, and their consumer equivalents, but with the new HD250 they have regressed. Perhaps they had bins full of these old remotes, to get rid of?

Mind you once you get past the limited range, and also the slightly soft feel of some buttons, it's a respectable remote. Still...

To paraphrase what I said in last year's DLA-RS15 review - 'perhaps the single greatest improvement of the RS15 is the new remote' - so you can see why I'm bummed with the switch back to the "old" one. If I shelf mount my RS20 behind me, there is no way I can get a good bounce off of the screen, I'll be foolishly holding the remote up and pointing behind me, every time I need to change something. The same would be true for the HD250.

Overall, the buttons are well organized and fairly well spaced. The buttons are of decent size. At the top are two power buttons. On the right is Power On, and on the left, is Standby (power off). You press Standby twice to power down.

The next pair are Lens (brings up the Lens focus, zoom, and shift controls), and Input.

Below those two are the Info button, Lens AP (aperture) for the manual iris, and on the right, Aspect ratio selection.

Next come eight image controls, including: Gamma, Color Temp, Color saturation, Tint, N.R. (noise reduction), Brightness, Contrast, and Sharpness.

Right above the four arrow keys in a round arrangement, are a Test button (toggles between test patterns) and a Hide button to black out the image.

In the center of the four arrow keys is a very large enter button. Below the arrow keys are the Menu button on the left, and Back button on the right.

There are 8 buttons for the modes, toward the bottom, Cinema 1, 2, Dynamic, etc. Three of the buttons are for your user defined modes User 1,2,3.

Finally! the last button, a wide thin one is the backlight button. It's in a good place. Since the remote itself is very dark, it's nice that the Light button glows slightly in the dark.

Click Image to Enlarge

Not bad, could be better. But then, remember, we reviewers are constantly playing with settings as we test and view products. You owners, will, by comparision hardly use the remote at all except for powering up and down and changing presets.

Other than the limited range, I have been pretty pleased with the rest of the remotes function. The amber backlight is just about right, in brightness, and easy to read the black labels placed on each lit up button.

© 2024 Projector Reviews

crossmenu linkedin facebook pinterest youtube rss twitter instagram facebook-blank rss-blank linkedin-blank pinterest youtube twitter instagram