Projector Reviews Images

Hisense 100″ Laser TV Review – A 4K UHD, Smart Projector with Screen – Hardware 1

Posted on January 2, 2019 by Art Feierman

Hisense 100″ Laser TV Review – Hardware: Overview, Inputs and Connectors, Lens

Overview

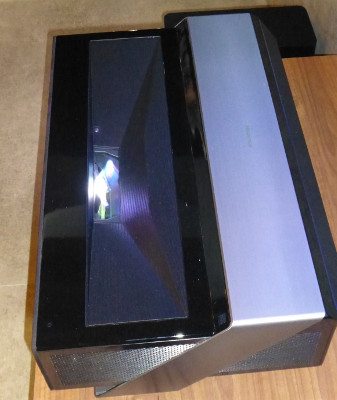
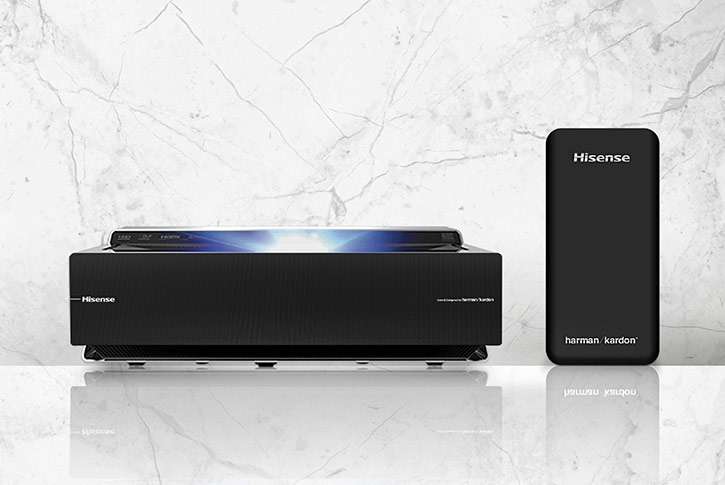
As always we start our hardware section off with an overview.  In this case, we’re looking at a 30 something (weight), ultra short throw projector.   As we usually consider the “front” that part of the projector that has the lens and faces the screen, with a UST projector we’ll also start on the top, since that’s where the lens system is.

Before we go further, the native resolution of this Hisense Laser TV is 2716x1528 x 2. That means it is using the higher of two TI DLP consumer 4K UHD chips (neither is native 4K).  By pixel shifting - firing a second time - shifting the pixels up and to the right by a half pixel, and by feeding slightly different information, this qualifies as a 4K UHD device - in that it can put 8 million different pixels on the screen. What it can't do, however, is put 8 million pixels on the screen without overlapping them.  This projector has pixels twice the size of a native 4K projector.

The optics are about dead center on the top.  Light comes out and illuminates the whole screen.  .That means light exiting the projector goes in most directions except down.  To put content on the lower left and lower right sides of the screen the light for those areas exits and is almost horizontal (at the bottom) while at about a 45 degree angle to the upper corners.

There’s nothing on the top of the Laser TV except for the glass protecting the optics, the Hisense logo, and some cosmetic design!

The back of the projector – closest to the screen, houses all the projector’s inputs and connectors.  More on that below.

The bottom of the projector has four large screw thread adjustable feet.  In this case, it is very important that all are adjustable, because of how critical, even the tiniest adjustment can affect filling the screen properly.

The front of the projector – which faces the audience, has a white power indicator light and a small Hisense logo next to it.   Speakers on the back (facing the viewers) pump out 50 watts maximum of audio to fill most rooms.

Overall, there’s some sculpting in the form of an aesthetic trim bar, but mostly this sits under the screen, is black and it won’t attract attention until it fills your screen.

Inputs and Connectors

inputs
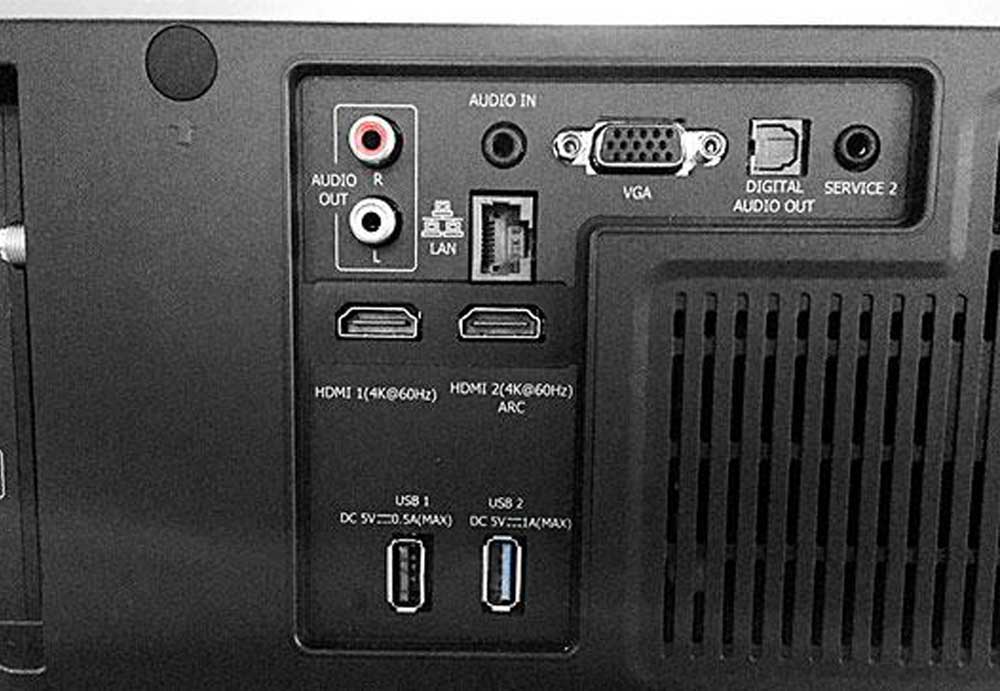
The inputs and connectors on the back of the Hisense Laser TV.

All of the Hisense Laser TV’s inputs are on the "back" – by our description, the part of the projector facing the screen.  This design keeps cables easy to hide, and out of the way. And should your table, credenza, or AV cabinet house your other gear such as 4K Blu-ray player, satellite receiver, streaming devices, and even a full AV receiver, things should stay very neat cable wise, which should please other members of your household.

That should prove especially true considering this projector is most likely destined for living rooms, media rooms, family rooms and bonus rooms, rather than dedicated home theaters.  (Hey, this projector works pretty great in my home theater too, where it is now, although I started viewing in a room with light gray walls, and a large side picture window.)

The collection of inputs is fairly typical for a serious home theater / home entertainment projector, from the top left:

There is a pair of RCA phono jacks for stereo audio output.  Then to the right, is one stereo mini audio input.  The “old school” computer VGA port is the next connector over (an HD15 connector).

Then, I find next, much to my approval, a Digital Audio Out jack, which is something many home entertainment systems with built in speakers lack.  This allows you to output, (among other things) audio that came into the Hisense Laser TV projector over its smart streaming capabilities.  That, along with other options, means you can use the internal sound system (and subwoofer) with smart capabilities and with other devices (like Blu-ray or Blu-ray UHD player sending audio over HDMI).  But you can also send any audio coming in through the projector to your separate surround sound system if you have one.  Cool.

The last connector on the top row is a service port, which I assume is for possible firmware upgrades or diagnostics.

On the second row (to the right of the audio jack), is the Ethernet jack – to hardwire to your home network. Now that’s always a great idea if you are streaming directly through the projector, as the hard wired network connection should prove faster and more reliable than using the wireless option (which the projector also has).

Below the RJ45 network connection are a pair of HDMI connectors.  Both are apparently HDMI 2.0 or higher as both indicate 4K@60Hz  It is possible that some very old HDMI devices won’t work with the HDMI 2.0, which is why many home theater and home entertainment projectors offer one HDMI 1.4 and one 2.0 or higher.

Finally further down are a pair of HDMI inputs.  (With 5 volt power) suitable for thumb drives aka memory sticks.  Hisense offers the suggestion of using a USB extension cable to simplify using those USB devices, since the jacks themselves are typically going to be hard to access once everything is set up.

Wait, we’re not quite done.  On the back but facing the right side (if you are looking toward the projector and screen), are three more connectors – a traditional threaded antenna input, another service port (mini-USB) and RS232 serial port for “old school” command and control.

The Lens

UST type projectors have optical systems rather different from traditional projectors, due to having to spread the light over a range of more than 140 degrees horizontally, and probably 70+ degrees vertically.  A mirror is usually involved as well. Truth is, I’ve never taken a close look at how the optics are laid out in UST projectors. Suffice to say that they work.

This Hisense Laser TV manages to spread light rather evenly across the screen.  We don’t measure the roll off in brightness to the edges and corners, but from extensive viewing, I am pleased to report that the evenness of light seems to be on par with most traditional projectors and better than a number of smaller portable projectors, some of which lose up to 30% brightness in the corners.  While 3LCDs tend to be overall better than DLPs, from our experience it is probably because there are more of the very small projector models with DLP designs.  Unless a projector is particularly bad in this area, it’s not something we are overly concerned with.  And definitely not concerned here!

Hisense 100″ Laser TV Review – Hardware: Overview, Inputs and Connectors, Lens

Overview

As always we start our hardware section off with an overview.  In this case, we’re looking at a 30 something (weight), ultra short throw projector.   As we usually consider the “front” that part of the projector that has the lens and faces the screen, with a UST projector we’ll also start on the top, since that’s where the lens system is.

Before we go further, the native resolution of this Hisense Laser TV is 2716x1528 x 2. That means it is using the higher of two TI DLP consumer 4K UHD chips (neither is native 4K).  By pixel shifting - firing a second time - shifting the pixels up and to the right by a half pixel, and by feeding slightly different information, this qualifies as a 4K UHD device - in that it can put 8 million different pixels on the screen. What it can't do, however, is put 8 million pixels on the screen without overlapping them.  This projector has pixels twice the size of a native 4K projector.

The optics are about dead center on the top.  Light comes out and illuminates the whole screen.  .That means light exiting the projector goes in most directions except down.  To put content on the lower left and lower right sides of the screen the light for those areas exits and is almost horizontal (at the bottom) while at about a 45 degree angle to the upper corners.

There’s nothing on the top of the Laser TV except for the glass protecting the optics, the Hisense logo, and some cosmetic design!

The back of the projector – closest to the screen, houses all the projector’s inputs and connectors.  More on that below.

The bottom of the projector has four large screw thread adjustable feet.  In this case, it is very important that all are adjustable, because of how critical, even the tiniest adjustment can affect filling the screen properly.

The front of the projector – which faces the audience, has a white power indicator light and a small Hisense logo next to it.   Speakers on the back (facing the viewers) pump out 50 watts maximum of audio to fill most rooms.

Overall, there’s some sculpting in the form of an aesthetic trim bar, but mostly this sits under the screen, is black and it won’t attract attention until it fills your screen.

Inputs and Connectors

inputs
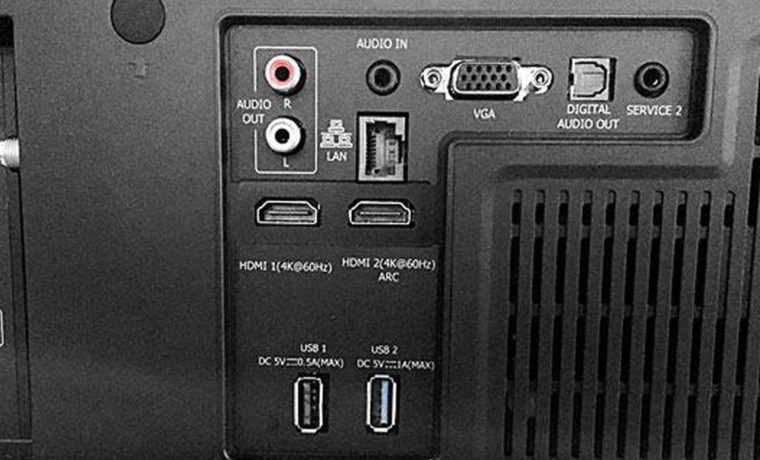
The inputs and connectors on the back of the Hisense Laser TV.

All of the Hisense Laser TV’s inputs are on the "back" – by our description, the part of the projector facing the screen.  This design keeps cables easy to hide, and out of the way. And should your table, credenza, or AV cabinet house your other gear such as 4K Blu-ray player, satellite receiver, streaming devices, and even a full AV receiver, things should stay very neat cable wise, which should please other members of your household.

That should prove especially true considering this projector is most likely destined for living rooms, media rooms, family rooms and bonus rooms, rather than dedicated home theaters.  (Hey, this projector works pretty great in my home theater too, where it is now, although I started viewing in a room with light gray walls, and a large side picture window.)

The collection of inputs is fairly typical for a serious home theater / home entertainment projector, from the top left:

There is a pair of RCA phono jacks for stereo audio output.  Then to the right, is one stereo mini audio input.  The “old school” computer VGA port is the next connector over (an HD15 connector).

Then, I find next, much to my approval, a Digital Audio Out jack, which is something many home entertainment systems with built in speakers lack.  This allows you to output, (among other things) audio that came into the Hisense Laser TV projector over its smart streaming capabilities.  That, along with other options, means you can use the internal sound system (and subwoofer) with smart capabilities and with other devices (like Blu-ray or Blu-ray UHD player sending audio over HDMI).  But you can also send any audio coming in through the projector to your separate surround sound system if you have one.  Cool.

The last connector on the top row is a service port, which I assume is for possible firmware upgrades or diagnostics.

On the second row (to the right of the audio jack), is the Ethernet jack – to hardwire to your home network. Now that’s always a great idea if you are streaming directly through the projector, as the hard wired network connection should prove faster and more reliable than using the wireless option (which the projector also has).

Below the RJ45 network connection are a pair of HDMI connectors.  Both are apparently HDMI 2.0 or higher as both indicate 4K@60Hz  It is possible that some very old HDMI devices won’t work with the HDMI 2.0, which is why many home theater and home entertainment projectors offer one HDMI 1.4 and one 2.0 or higher.

Finally further down are a pair of HDMI inputs.  (With 5 volt power) suitable for thumb drives aka memory sticks.  Hisense offers the suggestion of using a USB extension cable to simplify using those USB devices, since the jacks themselves are typically going to be hard to access once everything is set up.

Wait, we’re not quite done.  On the back but facing the right side (if you are looking toward the projector and screen), are three more connectors – a traditional threaded antenna input, another service port (mini-USB) and RS232 serial port for “old school” command and control.
The Lens

UST type projectors have optical systems rather different from traditional projectors, due to having to spread the light over a range of more than 140 degrees horizontally, and probably 70+ degrees vertically.  A mirror is usually involved as well. Truth is, I’ve never taken a close look at how the optics are laid out in UST projectors. Suffice to say that they work.

This Hisense Laser TV manages to spread light rather evenly across the screen.  We don’t measure the roll off in brightness to the edges and corners, but from extensive viewing, I am pleased to report that the evenness of light seems to be on par with most traditional projectors and better than a number of smaller portable projectors, some of which lose up to 30% brightness in the corners.  While 3LCDs tend to be overall better than DLPs, from our experience it is probably because there are more of the very small projector models with DLP designs.  Unless a projector is particularly bad in this area, it’s not something we are overly concerned with.  And definitely not concerned here!

© 2024 Projector Reviews

crossmenu linkedin facebook pinterest youtube rss twitter instagram facebook-blank rss-blank linkedin-blank pinterest youtube twitter instagram