Projector Reviews Images

Epson Pro Cinema G6550WU Projector Tour - Hardware and Menus

Posted on June 12, 2015 by Art Feierman
POWERLITE PRO G6550WU - Tour of the Hardware, including the Control Panel and Back Input Panel

G6550WU Overview

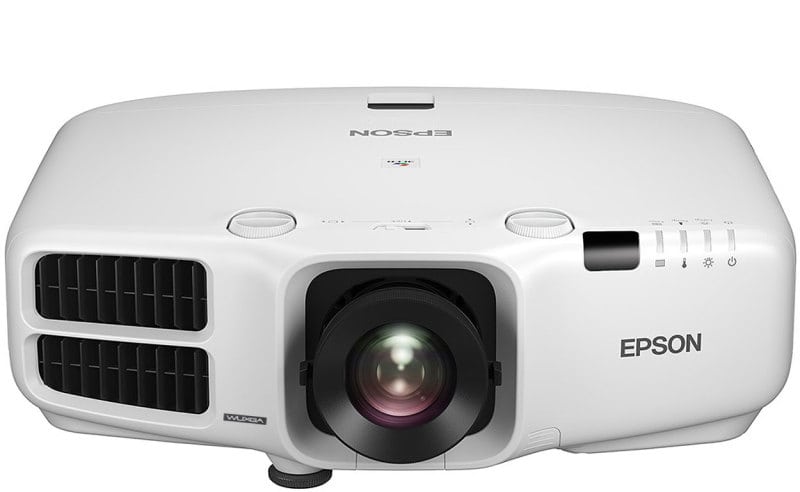
The Pro Cinema G6550WU comes in a near white finish.  So does the Powerlite Pro version.   Relative to its brightness and to having interchangeable lenses, it is relatively small, although there are smaller.  Canon's WUX6000 comes to mind as the smallest in this class.  This Epson weighs in at only 21.5 pounds with standard zoom lens.  The projector measures just under 20 inches wide, and less than 16 inches deep.

The manual zoom lens is center mounted, which, if nothing else, keeps the calculations for having the projector correctly aligned when mounting, just a  bit easier.

Large exhausts are located on either side.  There's also the button for releasing the interchangeable lenses.  There's a front IR sensor for the remote, (and a second one on the top and back), that wraps along those two surfaces.

The standard zoom lens has a tremendous amount of range, as it's a 1.8:1 zoom.  For those wanting more information on the six lenses, go to the last page of this review, and click for the data sheet, which does have that lens information.  The NL version (without the standard zoom lens), is $400 less.

The lenses are a manual affair, so that you focus by the outer barrel, and there is a ring with tabs for rotating to zoom in and out.

There's a single foot below, in the front, and two screw thread adjustable feet in the rear for a three point stance.

Moving to the top, find the two round lens shift dials, one for vertical, and one for horizontal shift.  That pretty much covers it for the top.  It's the back, where the rest of the action is.

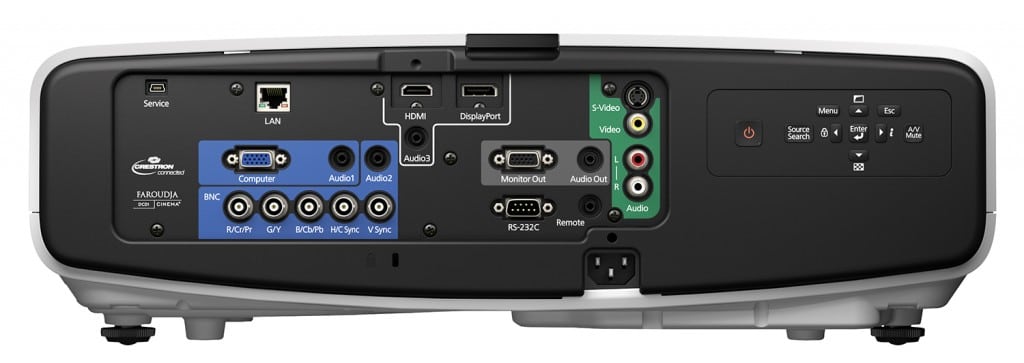
Looking at the back of the G6550WU, all the inputs and connectors - and there are quite a few of them - are on the left side.

When considering all these inputs, don't forget, there's also a wireless wifi module option for the G6550WU, but it plugs in out of sight, in the filter compartment on the side.  The projector also has the ability to use a USB key to quickly set up communication with multiple computers.

Let's check out that control panel first.

[sam_pro id=1_26 codes="true"]

Click Image to Enlarge

Control Panel

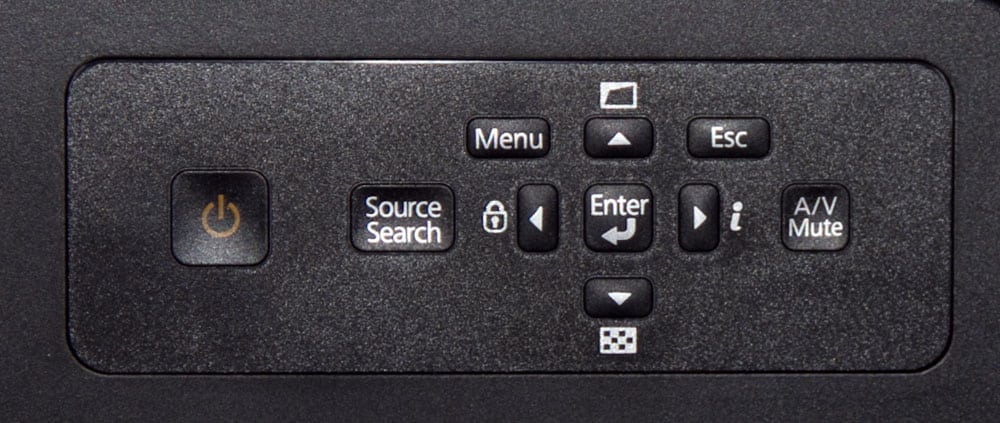
The G6550WU control panel is found on the back of the projector, to the right of all the inputs. It is a typical control panel in terms of features  Note that the usual indicator lights that on most projectors are found near the control panel, are, in this case, located the top front of the projector.

From from the left, first is the power switch - press once to power up, twice to power down.  Next over is the Source Search button, and then comes the four arrows in a diamond layout for navigation.  The Enter button is in the middle of the arrow keys, while the Menu, and the Escape buttons are respectively to the right and left of the up arrow.

When not in the menu system. each of the arrows has another function  Left arrow brings up the Control Panel lock menu, where you can lock out use of the panel for security. The up arrow brings up the keystone correction menu, while the right arrow doubles as the A/V Mute.  The down arrow brings up the first of 9 test patterns built into the projector (a black and white checkerboard pattern).

I can see where having the control panel right next to the connectors for all the inputs and networking would be a real advantage during installation, but especially for rental and staging use.

Click Image to Enlarge

Back Input and Connector Panel

Let's start top left (as usual).  First is a small mini-USB type connector for the service port.

The RJ45 connector is the LAN connector for your local area network.

HDMI comes next and the similar, but different connector for DisplayPort (more of a packet type interface - it works with data much the way the internet works).  Far to the right is the good old "stuff", consisting of an S-Video connector (DIN), a composite Video (RCA jack), and two audio in jacks - left and right (white and red RCA jacks).

Now to the second row of connectors:  From the left you'll find a standard analog computer input, with the traditional HD15 connector.  After a space, to the right are two stereo mini jacks for Audio in 1 and 2.

Below these, you'll find five BNC connectors in a row for component video RGB with sync.

We're almost done.

To the right of the Computer input is the traditional Monitor out (DB15), and below it, a DB9 RS232 serial port for command and control (old school).  That's almost it.  A bit to the right of that Monitor Out is a mini-jack for the stereo audio output.   The G6550WU projector may not have speakers but it will allow control and routing of audio to that output, to be fed to an external sound system.

The G6550WU projectors are extremely well endowed.

I would have liked to see a second standard HDMI input jack (also keeping the Display Port).  That would be more convenient in some installations.  Of course with an adapter, you can feed HDMI into the Display Port.

© 2024 Projector Reviews

crossmenu linkedin facebook pinterest youtube rss twitter instagram facebook-blank rss-blank linkedin-blank pinterest youtube twitter instagram