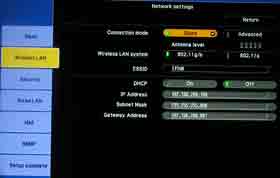
There is a basic or advanced setup. I started with basic. Installation was fine, but when it came time to find the projector, my laptop couldn't see it. Of course my laptop was already doing its wireless thing, for internet access. Turns out, with the Basic setup, you need to close your wireless connection and choose the Epson projector instead.
However, the Epson wireless scheme is very flexible. From the Advanced setup, instead you can essentially define the projector as another device on the wireless network. This allows the software, first of all, to see the projector.
The best news, though, is that, in this Advanced mode, you can project wirelessly to the Epson while still having full internet access, and that makes a lot of sense, especially today, where many meetings and presentations may need to access the web while using the projector wirelessly. Kudos for that capability.
There is some technical stuff going on, such as setting an essid name, on the computer to match the projector, so those who prefer to rely on knowledgeable support people, might want to call them in to do the whole setup. It is a 10 minute process from beginning to end.
Myself, when it comes to networking, I know little enough - enough to be dangerous. I took advantage of Epson's telephone support as soon as I realized that I couldn't get both internet and wireless working simultaneously (Basic setup). It was a wonderful experience. Despite my being on a Mac, not a PC, the support person, had virtually no problem. He had to put me on hold once for about a minute, but essentially we had the advanced running inside that 10 minute mark.
While talking with him, I addressed the issue of how well the Epson can handle videos wirelessly.
Turns out the software offers a Movie mode (selectable from the tool bar that appears when you launch the wireless software). The Movie mode is specifically for MPEG2, which can produce excellent quality videos (think Blu-ray and HD-DVD both, I believe).
Now remember, the projector is XGA - 1024x768, not your basic VGA of 640x480. In the past I've seen wireless solutions that could smoothly handle VGA, but XGA has roughly 3 times the size and data, making smooth full screen videos a true challenge.
I was most pleasantly surprised. Using the movie mode (and a 45 megabyte mpeg2 file that the Epson support person shot over to me), I was able to actually watch full screen hi resolution video, with out any jerkiness, nor visible degradation of image quality. That makes the Epson Powerlite 1815p a benchmark performer, that others will have to measure up to.
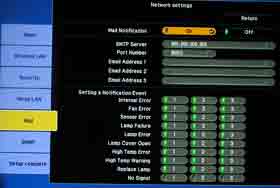
The Epson's other networking features include mail notification which will allow the Epson, interfaced to your network, to send out emails with the status of the projector, reminders to clean filters, fan problems, lamp replacement and more.
This is not uncommon today, with networked projectors, but more typically, this much capability, is found in the larger, more expensive ones that also offer interchangeable lenses. It's nice to see this type of ability in projectors that are getting down to reasonable prices for mass implementation in schools and universities, where a large fleet of projectors can be managed, mostly remotely.
Epson also has software for command and control operation, being able to adjust settings on the projector, from computers - (remote or local) on the network.
Overall, wireless networking performance was most impressive, expecially the full frame smooth video capability, a true weakness for just about all wireless networking solutions. If I have one bitch, it is that the documentation should warn right away, that when first installed, on your computer, that the projector won't be found by the software, if you are currently online wirelessly. That warning, with the instructions to go to the advanced setting, would probably save many people some frustration.
The Powerlite 1815p also has a PC card slot for computer free presentations. I did not test it but have used this capability myself in older Epson portable projectors, with great success.
Enough! time to look at the other general performance capabilities of the Epson Powerlite 1815p and 1810p.
Epson Powerlite 1815p Menus
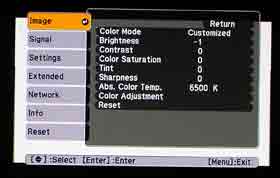
The Epson Powerlite 1815p menu structure is extremely similar to that of the many other Epson business projectors reviewed in the last few years. I would have to say, that Epson's attitude is that they have developed an excellent menu structure, and except for minor changes/improvements, have stuck with it.
As I have always found the Epson menus to be very logically laid out and intuitive, that Epson has been wise to stick with "what works."
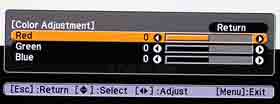
The menu above is the Epson's main Image menu, and offers the bulk of the image and color handling controls. First is the Color Mode which offers a number of preset "color modes". In addition, the usual controls for brightness, contrast, color saturation, tint (available only with certain types of sources - notably lower quality composite video), sharpness, and access to the Color Adjustment (color management) system. There is also an adjustable Color Temperature control, that allows a range of color temperatures, from very warm (redish) to cool (bluish) color balance of the image. The image below is one of the RGB color sub-menus. There is also a second one that provides six color control!
The Signal menu (not shown), relates primarily to locking in PC sources, if manual override is required. I found this Epson Powerlite 1815p projector, however to do an excellent job, automatically, and never had the need to do manual adjustments using the Signal menu.
The Settings menu (also not shown) offers an array of controls, including manual keystone correction both vertical and horizontal, or automatic, where the Epson adjusts the keystone setting based on the angle of the projector. This normally automatically gives you a nice rectangular image. Note that keystone correction always degrades the image slightly (as does compression technology). Since it does many will prefer not to use keystone correction if the image is only slightly trapazoidal.
Also on the Settings menu; lamp brightness mode, volume control, choosing whether to have just the front or rear infra-red sensors working, or both together, menu control of volume, and selection of which pointer style you want to use. Also present is operation lock, part of the security features.
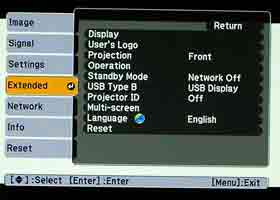
Next comes the Extended menu, shown here. From here you can put in a custom logo (to show up at powerup, etc.), some network controls, set the orientation of the projector (front, rear, ceiling, table)
With the Operation control, you can set Direct Power Up. This allows the projector to automatically power on when it receives AC power. This is a nice touch for ceiling mounted projectors, where a wall switch might control power to the projector and other devices. In such a case, throwing the wall switch would turn on the projector immediately, without having to hit the power button the projector or remote.
Multi-screen, is an interesting feature, although few will ever use it. It allows one to match the color balance, etc. of two Epson projectors working near each other, so that the image color aspects, brightness, etc., are as close as possible to each other.
The USB type B option allows you to send your computer's display image to the Epson projector so it can display from the USB B, instead of the usual computer inputs. The other option here relates to setting up the remote mousing.
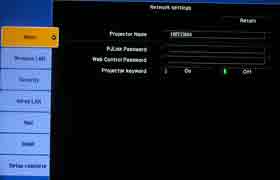
The Network menu, has already been covered above. Info gives you the usual information, source, lamp hours, etc.
Epson Powerlite 1815p Menus SlideShow

