Projector Reviews Images

Epson Brightlink Pro 1430Wi Projector Review - Hardware Tour 2

Posted on February 4, 2015 by Art Feierman
BRIGHTLINK PRO 1430Wi PROJECTOR – HARDWARE TOUR PAGE 2:  Inputs and Connectors, Control Pad, Remote Control

Connector Panel

Talk about a lot of connectors!  Fortunately most people will only use a modest number of these, as it would get very crowded in there if all were in used, but that's very unlikely to happen.

Close-up of Connector Panel

Close-up of Connector Panel

The 1430Wi's connector panel is located at the back of recessed 'cubbyhole' that can be accessed once the cover panel has been removed.  Let’s start in what appears in the photo above, as the top left, with the connector for the remote control pad (described in more detail below).

Next over is the audio out, in case you need some bigger sound than the 16 watt internal speaker system offers.  To the right out that is composite video input connector.  To its right are two USB ports. These are “Type A”, and can be used to plug in a USB thumb drive or other USB source.  To the right of the USB ports is the port for connecting the interactive "Touch Unit".  The cable to connect the Touch Unit to the projector is included.

On the far right is something unusual. There are a pair of jacks labeled Sync In, and Out.  These are used if more than one BrightLink interactive projector is being used in the same room at the same time.  The Sync allows the two to work together.  You’ll need the optional remote control cable kit specified in the manual to plug into each Sync.

The second row starts with a analog Computer 1 input and a Monitor Out. (both HD15 connectors).  These can be used for component video as well as analog computer.   Next over is RS252 connected and then a stereo audio input for those video connectors.

The lower row has another pair of stereo audio inputs on the left, then the USB “B” which might be used for display over USB.  An RJ45 LAN connector that let’s the 1430Wi tie into your local wired network.

Last but hardly least, HDMI2 and HDM1.  Note that HDMI1 indicates MHL, which is a a relatively new feature for BrightLink projectors, and a great idea.  It’s discussed in the Special Features pages.

Not visible in the above photo is the place to connector for the optional WiFi dongle.  This port is located on the side of the connector cubbyhole.

One input missing on the 1430Wi is a microphone input, that is found on some other Epson business and classroom models.

[sam_pro id=1_75 codes="true"]

Control Pad

The biggest difference in the Brightlink Pro 1430Wi as compared to the Brightlink 595Wi that I previously reviewed is the 1430Wi includes a "Control Pad".  the Control Pad, shown in the photo below, is intended to be mounted next to the white board and within easy reach of the presenter.

Epson 1430Wi - Control Box

Brightlink Pro 1430Wi Control Pad


The Control Pad “connection central” where you can conveniently plug in a printer, a USB flash drive (such as a USB flash drive with presentation slides) and other USB devices (such as flash drive for saving captured images).  It also provides user controls to select the projector's signal input, to switch the projector to Whiteboard mode, to capture documents (annotated or not),  to save images, and to print the contents of the projected image.  The Control Pad is a great feature for this interactive "system".

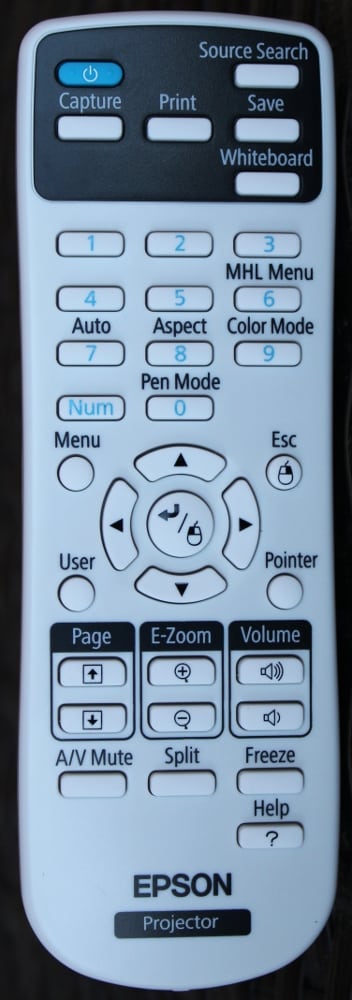
The Epson Brightlink Pro 1430Wi’s remotre control is a compact one.  No, it’s not a credit card type, it’s far larger than that, it has over 30 buttons on it.  The range is pretty good, certainly works at more than 20 feet. It also worked well with standing behind, but off toward the side of the projector.

Let’s take a look at the remote control’s feature set, starting at the top, as usual:

The power switch is a blue button (the only non-white button) at the top left.  It’s the usual, “press once for on, press twice to turn off.”  To top-right is Source Search which let’s you manually toggle through all the many inputs, or let it search to find the first one that’s active.

Below those buttons is a row of 3 buttons for 'Capture', 'Print', and 'Save' that are used to capture, print and save the image that is being displayed on the screen.  Below those is a button to switch the projector to Whiteboard mode.

Next comes four rows that are first, a numeric pad, useful with this projector for several functions, including security.  But five of the buttons take on other uses when not in Numeric mode.  Those functions are labeled, and are:  MHL Menu, Auto (for syncing to a computer – if needed), Aspect Ratio, Color Mode (toggle through the choices), and Pen Mode.

The next section is navigation  Menu on the upper left, and the four arrow keys in a round configuration in the center.  Enter button (which can double as left mouse click) is in the middle of those arrows. The Escape button is upper right, across from Menu.

There’s a User button you can program (select a desired function) below Menu, and across from it, a button to bring up one of the three pointers.

Below all of that are three pair of buttons. Left are Page Up/Down for basic interactive (aka remote mousing), then E-zoom (digital zoom), and Volume Up/Down.

Three to go:  A/V Mute (left), which blanks the screen and audio, Split (center), which puts the projector into split screen mode, and Freeze, which does what you expect: Freeze what’s on the screen.  Finally, at the bottom right is Epson’s interactive  Help function.

That pretty much covers the Epson’s remote control.  Naturally it comes with batteries, a pair of double A’s, to be specific.   No backlight, but rarely is one needed on a projector that can light up a room with over 3000 lumens.

Click Image to Enlarge

© 2024 Projector Reviews

crossmenu linkedin facebook pinterest youtube rss twitter instagram facebook-blank rss-blank linkedin-blank pinterest youtube twitter instagram