DVDO Specs | |
---|---|
Price | |
Technology | |
Native Resolution | |
Brightness (Manufacturer Claim) | |
Contrast | |
Zoom Lens Ratio | |
Lens Shift | No |
Lamp Life | |
Weight | |
Warranty |
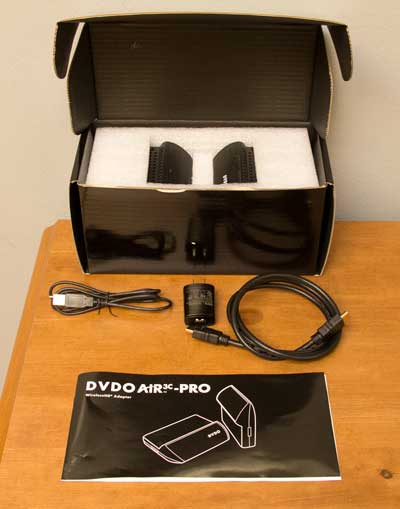
The DVDO Air3C Pro comes nicely packed with all the goodies needed that you can think of for placing these two Air3C Pro pieces - the transmitter and receiver, where then need to go. The box itself is rather large (relatively speaking). Inside there's a short manual, but at least it's of large size, not those typical 2x2 inch folds out into large page, tiny type manuals that show up with so many products these days. Open the box and as you can the image above, the two DVDO pieces, both partially tucked under the styrofoam like material. Remove that layer and there's a whole lot of additional goodies in the box. You can see them all laid out in one of the images below. We'll take a closer look shortly. Ultimately there's a transmitter that you place by your sources and a receiver to plug into your display, into an HDMI input. The hardware supports HDMI 1.4, including support CEC for controlling HDMI devices. That might allow a projector's remote (if it supports HDMI-link - CEC), to also control a compatible Blu-ray player or other devices, perhaps even an AV receiver. With HDMI 1.4 support that means that the Air3 also can support Blu-ray 3D (as well as other 3D standards). Officially the Air3 supports up to 1080p/60. But that includes frame packing used by Blu-ray 3D. It supports the current 3D standards for HDTV and Blu-ray.
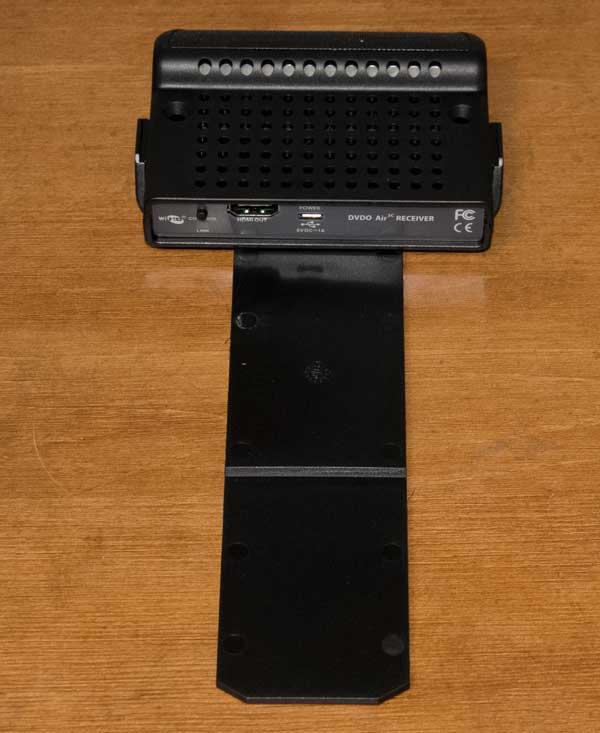
DVDO did a good job of providing for a variety of installation situations. The big "ice scraper" looking pieces are for wall or ceiling mounting the transmitter and or the receiver. When you don't need the whole piece, each can have the excess removed. They both have two screw holes for mounting. The DVDO transmitter and the receiver also have screw holes passing through them for mounting. The adhesive material will let you stick the pieces directly to perhaps the back of an LCD display, or a projector, or a receiver… Two HDMI cables are included. They are relatively short - after all, the devices should be right next to your sources and right next to the display device. Four screws are provided (hard to see in the picture) - in a mini-zip lock below the left side of the stickies. The power supplies for the two units consist of a wall plug with a USB connector, and a USB to USB mini cable. The "mini" side plugs into the DVDO transmitter or receiver. There are two of the "ice scraper" mounts, two HDMI cables, two power supplies with USB cables, and of course the transmitter and receiver, as the main components.
The back of these units looks the same as the standard Air3 we reviewed previously. In fact the Air3C Pro units still only say DVDO Air (not Air3C Pro). In other words the units look the same, but the differences are inside (and configuration software). The image above shows the back of both the transmitter and the receiver.
Note that there is only a single HDMI input connector, the Air3C Pro isn't designed to be a switch box. That means that since you almost certainly have more than one HDMI source, you'll be using an AV receiver that has multiple HDMI inputs, or a separate HDMI switch box between your sources and the DVDO.
I've included an image of the Quick6r in the photo player above. DVDO has such a switch box, called the Quick 6, and one, I'm told has been shipped to us as I'm writing this up. What makes it particularly cool, is that the Quick6 and Quick6r (with MHL support, including special support for Roku sticks), are both UHD 4K compatible, not that we've had a chance to check them out (but soon, and I do have 4K content here to verify.
Let's look from the left side of the back of the Pro, starting with the transmitter. There's a small Control button which when pressed for 2-3 seconds has it seek out a receiver. Holding for more than 5 seconds does a factory reset. Right below the button is a small indicator light that says Link, which will indicate when the transmitter is talking successfully with a receiver. Next comes the HDMI input, and then a small service port. Finally the jack for the DC power cable. The Receiver, also has the same Control button and Link light, but this time, the Receiver's Control button when pressed looks for the transmitter. Next comes the HDMI output for your display, and that leaves only the connector for the DC power supply. Note that it uses the same connector type that's used for the service port on the transmitter, and is in the same location. Saves manufacturing costs I trust. That leaves only the magic of the airwaves, as the transmitter pushes your HDMI sources to the receiver.
Missing are digital audio connectors (TOSLINK). It might have been nice to have them on both ends, or at least on the transmitter end. That said, if you don't need a separate switch box for multiple HDMI sources, you probably also don't need a digital audio solution, and if you have such needs, the DVDO Quick6 might be the solution.