Projector Reviews Images

Casio XJ-M145 Projector - Physical Tour

Posted on July 19, 2013 by 

Casio XJ-M145 Appearance

The Casio XJ-M145 has its lens recessed and offset to the right side of the projector when facing it.  There is a tethered lens cover that protects the lens when not in use. To the left of the lens is an IR receiving eye and a vent.  There is a center height adjustment foot as well.  The left side of the projector consists of recessed focus and zoom rings for the lens and air intake vents.  The right side is basically a hot air exhaust vent.


On top of the projector, toward the rear portion, is a control panel with the following functions: Power On/Standby, Input, Auto (adjust position, frequency and phase for RGB sources), Menu, Navigation (Up, Down, Left, Right and Enter) and Escape.  There are also indicator lights for Power (on or standby), Lamp (warning for replacement or failure) and Temp (warning for overheating).

The rear panel of the XJ-M145 sports, from left to right, the following: an additional IR receiving eye, a USB jack, a LAN jack, serial port for RS-232 control, a VGA computer input, 1/8” audio input and output jacks, an HDMI input, stereo audio RCA input jacks, composite and S-video inputs, a Kensington lock port, a built-in 5-watt speaker and the power connector.

Moving to the bottom of the projector, there are two adjustable screw feet in the back corners for adjusting the projector height when table mounted.

Casio XJ-M145 Setup and Use: Control Panel and Menus

The Casio XJ-M145 can be set up fairly quickly, thanks to the zoom, adjustable rear feet and keystone adjustment.  Contrary to most DLP projectors in this price range, which generally have no more than a 1.2X zoom, the XJ-M145 has a 1.5X zoom.  This allows greater flexibility in the distance the projector is positioned from the screen.  Next, if you’re using the projector sitting on a table or cart and you don’t have a fairly level surface, the image height can be quickly adjusted and leveled with the front and rear adjustment feet.  If the projector is still not level and you’re in a hurry, the auto-keystoning feature will square the image to the screen with minimal edge distortion.  We typically recommend that if you have to use keystone adjustment, you should keep it to a minimum to avoid unwanted picture distortion, so the closer you can get the projector to level, the better your image will be.  You can also use the manual keystone adjustments to ensure that your keystone correction is minimal.  Nonetheless, the auto keystone feature in the XJ-M145 works quite well for small adjustments.


Eco Mode Menu

Other menus allow you to select the automatic features, set up network presentations and the other usual presentation adjustments. There is also an Eco power setting that allows for manual selection of 5 different levels of brightness. When this setting is on Auto, a brightness sensor on the top of the projector automatically detects the ambient light level in the room and adjusts brightness accordingly. More about that feature in the Performance section of this review.

Main Menu

Once set up, the user brings up the menu, goes to the Image Adjustment 1 section and selects the desired Color mode (Standard, Graphics, Theater, Blackboard and Game), depending on the intended use. There is no User mode, but the usual picture adjustments (contrast, brightness, saturation (color), tint and sharpness) are available for each mode. In addition, there is the ability to choose between three different color temperatures and make individual RGB adjustments to the Normal color temp. There is also the ability to turn the lamp Eco mode (On by default) off, but once off, none of the Color modes can be selected or adjusted. There is an Image Adjustment 2 menu that is only used for setting positioning and timing for sync a non-standard RGB source.

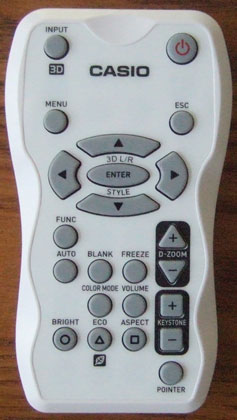
Casio XJ-M145 Remote Control

There’s nothing particularly interesting about the XJ-M145 remote.  It is small and straightforward with a minimal number of buttons, all nicely spaced.  The buttons are gray on a white background, which are easily accessed even without backlighting or glow-in-the-dark ability.  There are buttons for the most important functions, which include: Power, Input/3D, Auto adjustment, Blank (to blank out the screen), Freeze, Volume, Color Mode, Digital zoom plus/minus, Keystone plus/minus, Bright and Eco lamp modes, Aspect ratio, Function, Menu, Navigation (Up, Down, Left and Right), Escape and Enter.  There is also a button to activate an on-screen pointer, which can be moved and changed by the navigation keys.

Overall, the remote is appropriate for its intended use.  Unlike many projectors in its class, the buttons are fairly well spaced and contrast well enough with the color of the remote to make locating them easy.

Click Image to Enlarge

© 2024 Projector Reviews

crossmenu linkedin facebook pinterest youtube rss twitter instagram facebook-blank rss-blank linkedin-blank pinterest youtube twitter instagram