Projector Reviews Images

Casio XJ-L8300HN Projector Review – Hardware 1

Posted on October 19, 2017 by Nikki Zelinger

Casio XJ-L8300HN Projector Review – Hardware 1: Overview, Inputs and Connectors Panel, The Lens, Control Panel, Remote Control

Overview

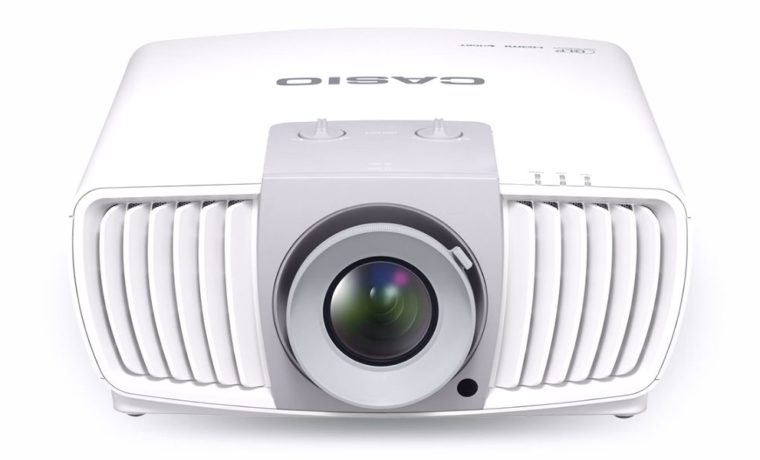
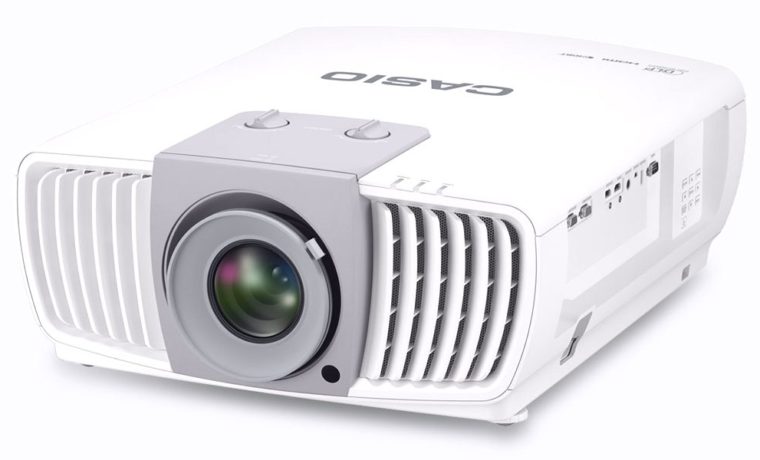
The Casio XJ-L8300HN is an oblong beast of a projector, weighing 43.7 pounds and measuring 18.5 inches wide, 22.2 inches deep, and 8.1 inches tall. When I took it out of the box, I was struck by the length of it, as I (wrongly) assumed it would be the same general square-ish shape of the last Casio projector I reviewed. The projector can be table or ceiling mounted, front facing or rear facing, as is typical.

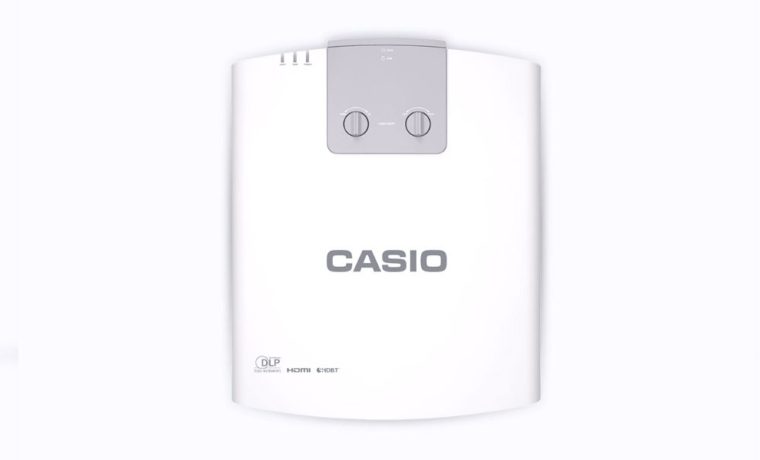
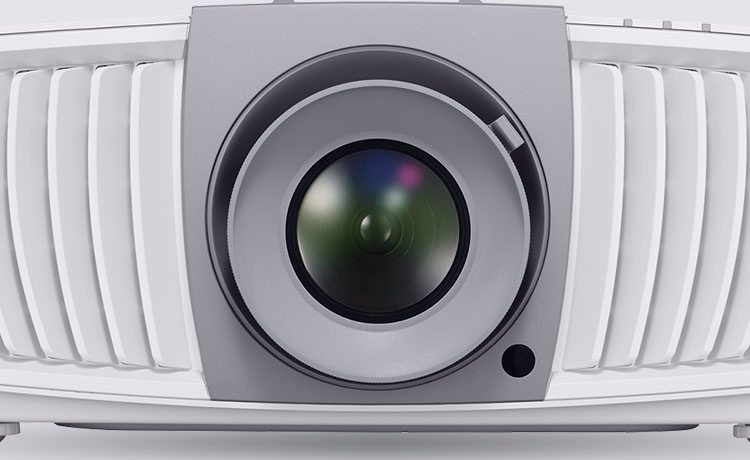
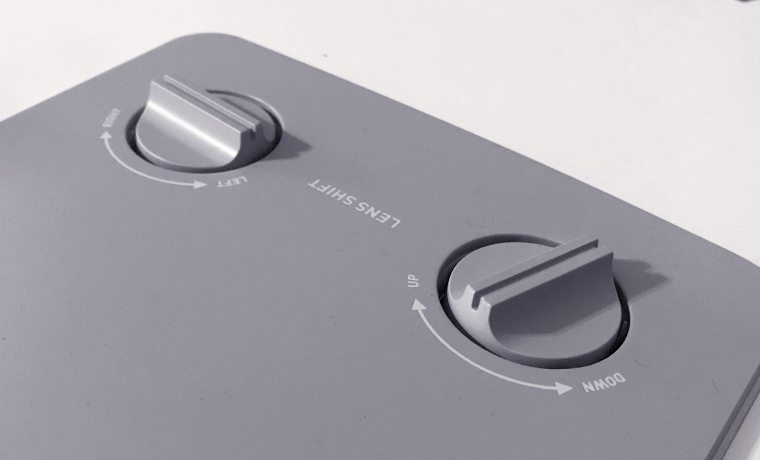
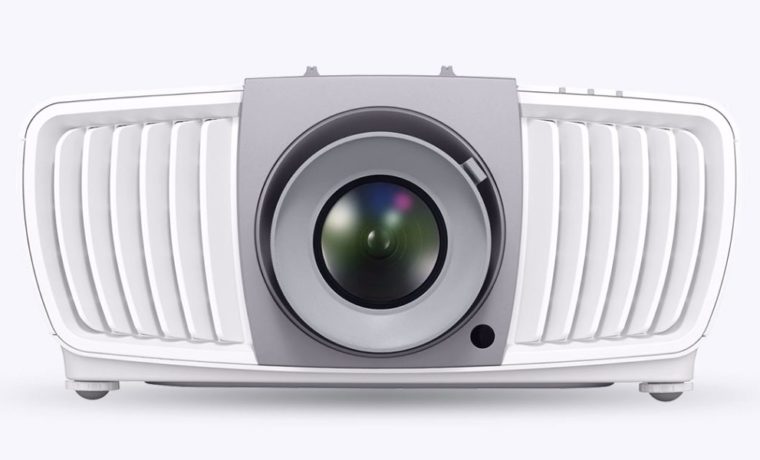
The lens is center mounted, with manual controls for focus, zoom, and lens shift. Those lens shift controls are located on the top of the projector, just a few inches back from the lens. There are two lens shift controls – one for vertical and one for horizontal. These are dials that you twist left or right to move the lens. The indicator lights are also on the top, just to the left when looking at the lens.

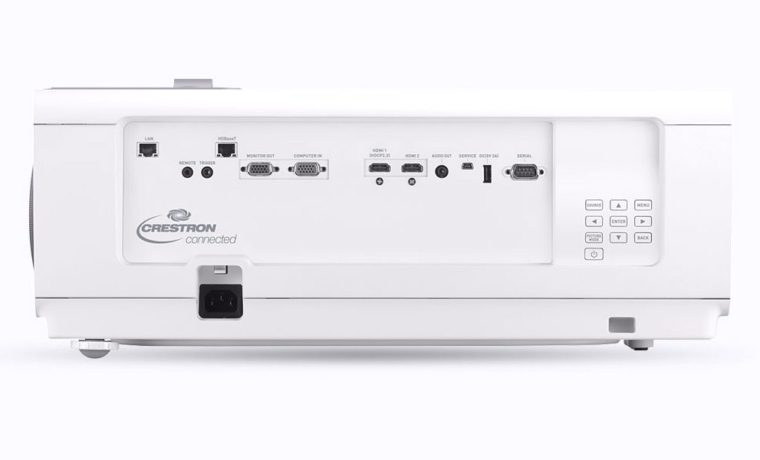
The hot air exhaust vents live on either side of the lens. The cool air intake vents are on the back of the projector. The “back panel” is actually located on the right side of the projector when facing the lens. It’s got all the necessary ports for most business/education applications, with no real bells or whistles aside from the HDBaseT port. To the right of the panel, toward the back of the XJ-L8300HN, is the control panel.

Inputs and Connectors Panel

Casio XJ-L8300HN Inputs and Connectors CU
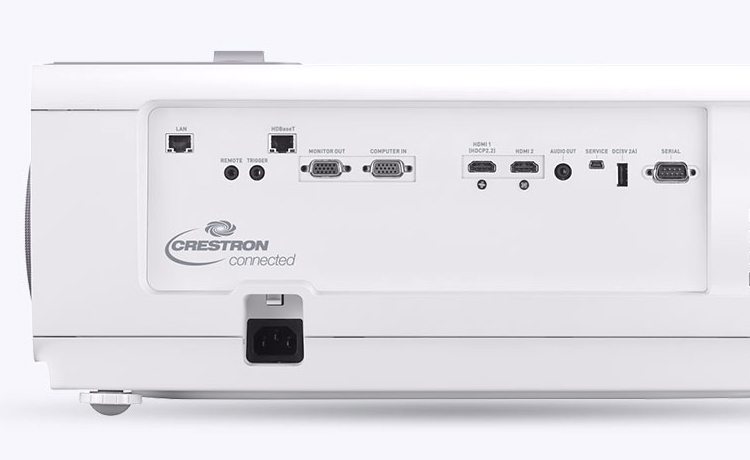
The Casio XJ-L8300HN's inputs and connectors panel is simple, but well equipped for most business and education applications.

The Casio XJ-L8300HN has a simple inputs and connectors panel, but it has enough ports to get the job done. At the top left, there’s a LAN Ethernet port, and to its right, the HDBaseT port. Below that, and slightly to the left, are two inputs – one for hard wiring the remote control (often needed in a really large room if the projector is beyond the range of the remote (typically 10 meters - 33 feet), or for rear screen setups.   There's also an output for a, 12 volt Screen Trigger, to control a properly equipped motorized screen or other device that accepts a 12 volt on/off signal, which could even trigger turning off lights when the projector is powered up.

Next to those are the regular Monitor Out and Computer In connectors. To their right, we have a pair of HDMI ports, one of which is labeled as HDMI HDCP 2.2. Moving right along, there is the Audio Out input. This is important if you want any sound whatsoever, as there are no built-in speakers. In most reviews I write, I recommend potential buyers to get external speakers, whether the projector has internal speakers or not. With a high-end, large venue projector such as the XJ-L8300HN, manufacturers expect that you will have an external speaker system, or more likely, a full room sound system installed so that the audio can fill the entire venue.  (That system most likely will also include microphone amplification for the presenter since it is going to be a large room...)

There are only three inputs left on the back panel: a Service port, a DC (5V 2A) USB style connector, and a Serial port for old school command and control. That does it for our inputs and connectors! If you need more connectivity - not likely - look elsewhere, or purchase a third-party signal splitter. I mentioned on the previous page that you can connect more sources over HDBaseT by getting an HDBaseT transmitter, so take that into account when considering this projector.

The Lens

The Casio XJ-L8300HN has a 1.5:1 manual lens, adding to the projector’s placement flexibility. The manual zoom and focus rings protrude just outside of the lens’ recessed casing, which works well. The lens shift controls, as mentioned in the Overview section of this page, are located on the top of the projector, behind the lens.

The two separate dials for vertical and horizontal lens shift are easy to turn and I didn’t have any issues with them. I reviewed a projector that had motorized lens shift and it was very easy to overshoot the screen, whereas with these manual controls, positioning the image was a piece of cake.

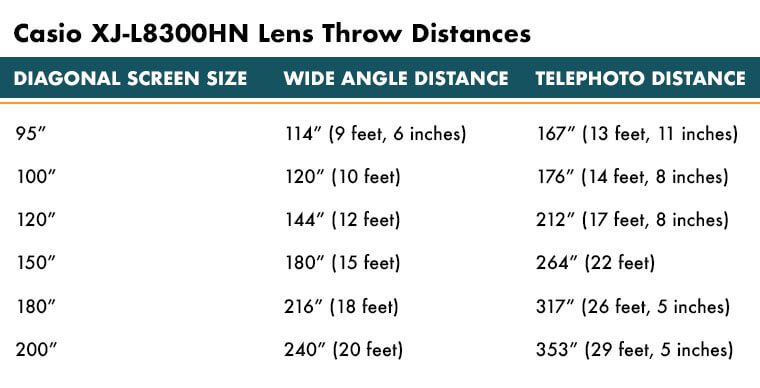
It’s unlikely, once you mount it, that you’ll need to spend much time with the lens. The few times you do, it’ll be a pleasant experience. Below, I have provided a chart detailing throw distances - that is, how far away you'll need to place the projector for the size of your screen. Casio boasts a crystal clear image on screen sizes ranging from 95" to 200" diagonally.

Casio XJ-L8300HN Lens Throw Distances Table

If you have a 100" screen, 16:9, the height of the screen will be just about 50" (slightly below, but for the sake of this discussion, we're rounding up). That means, with 60% lens shift, you can move the projector up (or down) approximately 30". The projector can be mounted anywhere between five inches above the top of the screen surface, to five inches below the bottom of the screen surface - it can work anywhere in this range. That does it for the lens and our discussion of its shifting capabilities. Happy mounting!

Control Panel

Casio XJ-L8300HN Control Panel
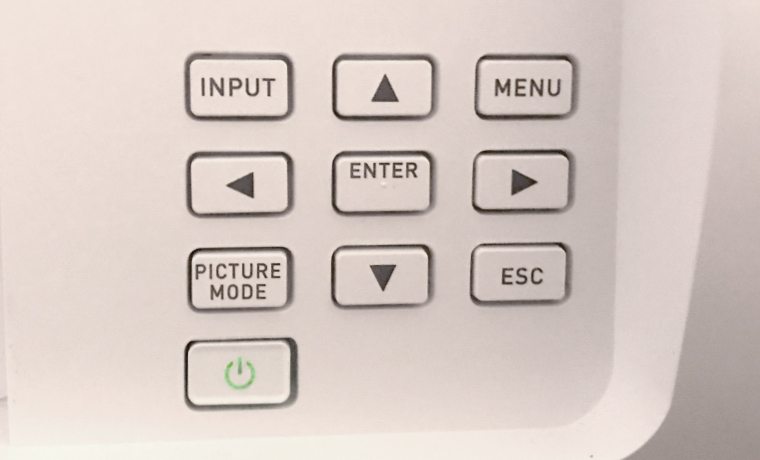
The Casio XJ-L8300HN's control panel has a basic configuration and is located to the right of the inputs and connector panel, on the righthand side of the projector when looking at the lens.

The Casio XJ-L8300HN’s control panel is located to the right of the inputs and connectors panel. There are ten buttons altogether. In the center of everything are the navigational buttons – the usual up, down, left and right buttons surrounding an Enter button.

Four additional buttons live in the corners of this configuration. The top left corner has the Source button, to the left of the up arrow key, with the Menu button as its opposite. To the left of the down arrow key is the Picture Mode button, and to the right, the Back button. Directly below the Picture Mode button, we have the Power button.

The Remote Control

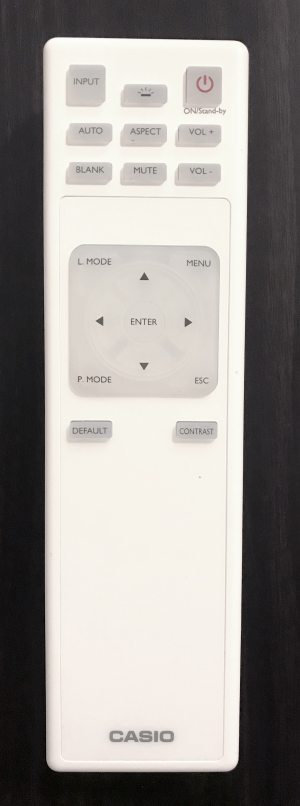
Casio could have done with a smaller remote, for all the buttons on it. It only has 20 buttons, including the traditional navigational arrows. I’ll start with the top section if the remote and move down.

The top section of the remote control consists of nine buttons. Starting at the top left, there are the Input, Backlight, and Power buttons. Input, of course, brings up the Inputs Menu. The Backlight button is something I appreciate – the backlighting is a bright blue that one may not wish to have on all the time. It really is quite bright. Next to that is the Power button. Hit once for on, twice for off, as is standard.

Below the Power button are the two Volume buttons, stacked vertically. The two buttons next to the Volume + button are Aspect and Auto, going from right to left. Under those are Blank and Mute.

In the next section, there is a rubber square with the standard directional arrow keys surrounding an Enter button. At each corner lives a button. The top left button is L-Mode, which brings up the Lamp Mode Menu, allowing quick switching from Full Power to Eco Modes. The bottom left button is P-Mode, which allows you to cycle through the different Color Modes without opening the menus.

Speaking of menus, the button for that is in the top right hand corner. The Escape button is the final one, located in the bottom right corner of the square. The final two buttons are Default and Contrast – buttons you may need once in a blue moon. At the very bottom of the remote is a port for a remote trigger for wired control of the projector.

Casio XJ-L8300HN Remote Control
The Casio XJ-L8300HN remote control is a simple, no-frills remote that is well laid out and has a nice blue backlight.

Casio XJ-L8300HN Projector Review – Hardware 1: Overview, Inputs and Connectors Panel, The Lens, Control Panel, Remote Control

Overview

The Casio XJ-L8300HN is an oblong beast of a projector, weighing 43.7 pounds and measuring 18.5 inches wide, 22.2 inches deep, and 8.1 inches tall. When I took it out of the box, I was struck by the length of it, as I (wrongly) assumed it would be the same general square-ish shape of the last Casio projector I reviewed. The projector can be table or ceiling mounted, front facing or rear facing, as is typical.

The lens is center mounted, with manual controls for focus, zoom, and lens shift. Those lens shift controls are located on the top of the projector, just a few inches back from the lens. There are two lens shift controls – one for vertical and one for horizontal. These are dials that you twist left or right to move the lens. The indicator lights are also on the top, just to the left when looking at the lens.

The hot air exhaust vents live on either side of the lens. The cool air intake vents are on the back of the projector. The “back panel” is actually located on the right side of the projector when facing the lens. It’s got all the necessary ports for most business/education applications, with no real bells or whistles aside from the HDBaseT port. To the right of the panel, toward the back of the XJ-L8300HN, is the control panel.

Inputs and Connectors Panel

Casio XJ-L8300HN Inputs and Connectors CU
The Casio XJ-L8300HN's inputs and connectors panel is simple, but well equipped for most business and education applications.

The Casio XJ-L8300HN has a simple inputs and connectors panel, but it has enough ports to get the job done. At the top left, there’s a LAN Ethernet port, and to its right, the HDBaseT port. Below that, and slightly to the left, are two inputs – one for hard wiring the remote control (often needed in a really large room if the projector is beyond the range of the remote (typically 10 meters - 33 feet), or for rear screen setups.   There's also an output for a, 12 volt Screen Trigger, to control a properly equipped motorized screen or other device that accepts a 12 volt on/off signal, which could even trigger turning off lights when the projector is powered up.

Next to those are the regular Monitor Out and Computer In connectors. To their right, we have a pair of HDMI ports, one of which is labeled as HDMI HDCP 2.2. Moving right along, there is the Audio Out input. This is important if you want any sound whatsoever, as there are no built-in speakers. In most reviews I write, I recommend potential buyers to get external speakers, whether the projector has internal speakers or not. With a high-end, large venue projector such as the XJ-L8300HN, manufacturers expect that you will have an external speaker system, or more likely, a full room sound system installed so that the audio can fill the entire venue.  (That system most likely will also include microphone amplification for the presenter since it is going to be a large room...)

There are only three inputs left on the back panel: a Service port, a DC (5V 2A) USB style connector, and a Serial port for old school command and control. That does it for our inputs and connectors! If you need more connectivity - not likely - look elsewhere, or purchase a third-party signal splitter. I mentioned on the previous page that you can connect more sources over HDBaseT by getting an HDBaseT transmitter, so take that into account when considering this projector.

The Lens

The Casio XJ-L8300HN has a 1.5:1 manual lens, adding to the projector’s placement flexibility. The manual zoom and focus rings protrude just outside of the lens’ recessed casing, which works well. The lens shift controls, as mentioned in the Overview section of this page, are located on the top of the projector, behind the lens.

The two separate dials for vertical and horizontal lens shift are easy to turn and I didn’t have any issues with them. I reviewed a projector that had motorized lens shift and it was very easy to overshoot the screen, whereas with these manual controls, positioning the image was a piece of cake.

It’s unlikely, once you mount it, that you’ll need to spend much time with the lens. The few times you do, it’ll be a pleasant experience. Below, I have provided a chart detailing throw distances - that is, how far away you'll need to place the projector for the size of your screen. Casio boasts a crystal clear image on screen sizes ranging from 95" to 200" diagonally.

Casio XJ-L8300HN Lens Throw Distances Table

If you have a 100" screen, 16:9, the height of the screen will be just about 50" (slightly below, but for the sake of this discussion, we're rounding up). That means, with 60% lens shift, you can move the projector up (or down) approximately 30". The projector can be mounted anywhere between five inches above the top of the screen surface, to five inches below the bottom of the screen surface - it can work anywhere in this range. That does it for the lens and our discussion of its shifting capabilities. Happy mounting!

Control Panel

Casio XJ-L8300HN Control Panel
The Casio XJ-L8300HN's control panel has a basic configuration and is located to the right of the inputs and connector panel, on the righthand side of the projector when looking at the lens.

The Casio XJ-L8300HN’s control panel is located to the right of the inputs and connectors panel. There are ten buttons altogether. In the center of everything are the navigational buttons – the usual up, down, left and right buttons surrounding an Enter button.

Four additional buttons live in the corners of this configuration. The top left corner has the Source button, to the left of the up arrow key, with the Menu button as its opposite. To the left of the down arrow key is the Picture Mode button, and to the right, the Back button. Directly below the Picture Mode button, we have the Power button.

The Remote Control

Casio could have done with a smaller remote, for all the buttons on it. It only has 20 buttons, including the traditional navigational arrows. I’ll start with the top section if the remote and move down.

The top section of the remote control consists of nine buttons. Starting at the top left, there are the Input, Backlight, and Power buttons. Input, of course, brings up the Inputs Menu. The Backlight button is something I appreciate – the backlighting is a bright blue that one may not wish to have on all the time. It really is quite bright. Next to that is the Power button. Hit once for on, twice for off, as is standard.

Below the Power button are the two Volume buttons, stacked vertically. The two buttons next to the Volume + button are Aspect and Auto, going from right to left. Under those are Blank and Mute.

In the next section, there is a rubber square with the standard directional arrow keys surrounding an Enter button. At each corner lives a button. The top left button is L-Mode, which brings up the Lamp Mode Menu, allowing quick switching from Full Power to Eco Modes. The bottom left button is P-Mode, which allows you to cycle through the different Color Modes without opening the menus.

Speaking of menus, the button for that is in the top right hand corner. The Escape button is the final one, located in the bottom right corner of the square. The final two buttons are Default and Contrast – buttons you may need once in a blue moon. At the very bottom of the remote is a port for a remote trigger for wired control of the projector.
Casio XJ-L8300HN Remote Control
The Casio XJ-L8300HN remote control is a simple, no-frills remote that is well laid out and has a nice blue backlight.

© 2024 Projector Reviews

crossmenu linkedin facebook pinterest youtube rss twitter instagram facebook-blank rss-blank linkedin-blank pinterest youtube twitter instagram