Projector Reviews Images

BenQ W1500 Projector - Hardware Tour

Posted on December 25, 2013 by Art Feierman
BENQ W1500 PROJECTOR - HARDWARE TOUR

General Appearance

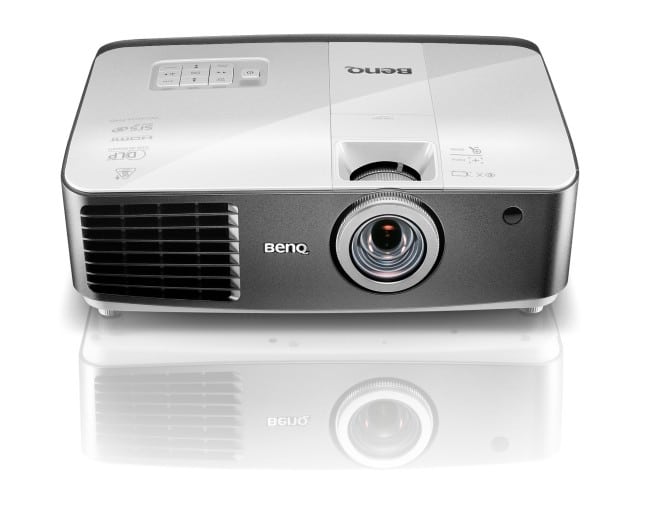
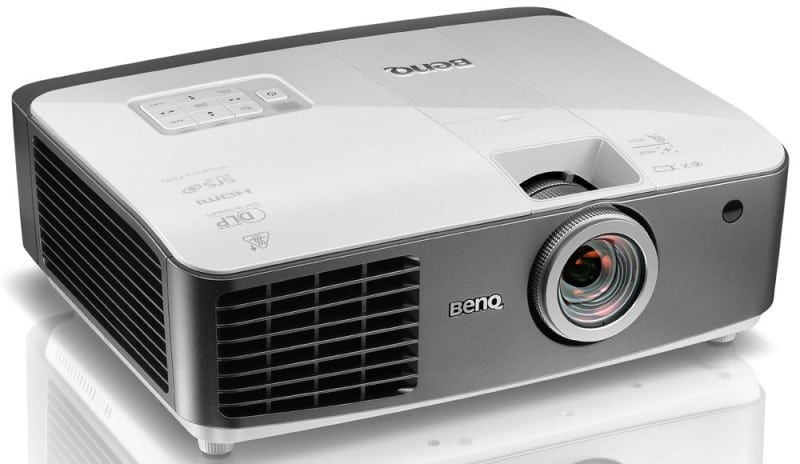
We begin our tour of the BenQ W1500 projector in the front.   BenQ's 1.6:1 manual zoom (with twice the range of the lower cost W1070's 1.3:1 zoom), is mounted off center, slightly to the right (if facing the projector.  Further to the right and above, is the front infra-red sensor.  To the left is a large exhaust vent.  Down below are two screw thread adjustable front feet.

Overall, the W1500 projector is a modestly attractive box.  There's definitely curved corners, and some sculpting, so I would say it's relatively attractive (to significant others), especially since it is relatively small, definitely when compared to the 3LCD competition.

The top of the BenQ projector has recessed focus and zoom dials, (above and slightly back from the lens in the front.

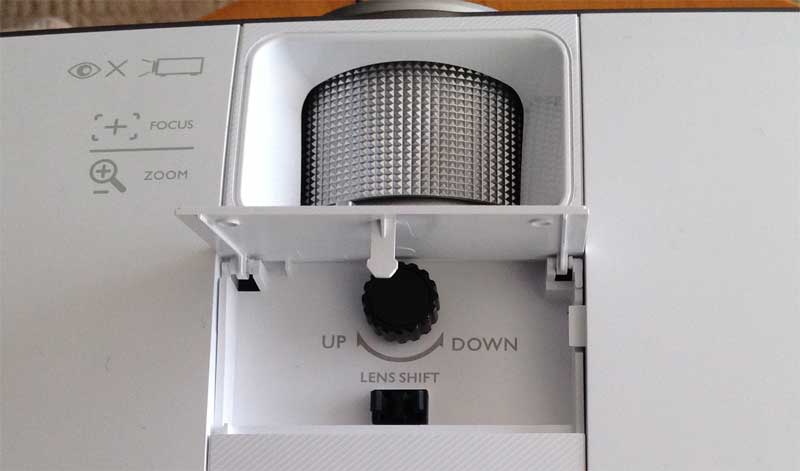
Just behind the lens focus and zoom, is a small spring loaded door, which hides the vertical lens shift control.  Further back and further to the left is a full control panel, which we'll take a close look at, in a moment.  Also accessible from the top, is the Lamp door, for replacing the lamp when its time.  That's a good place for it, you won't have to unmount a ceiling mounted W1500, just to change out the lamp.

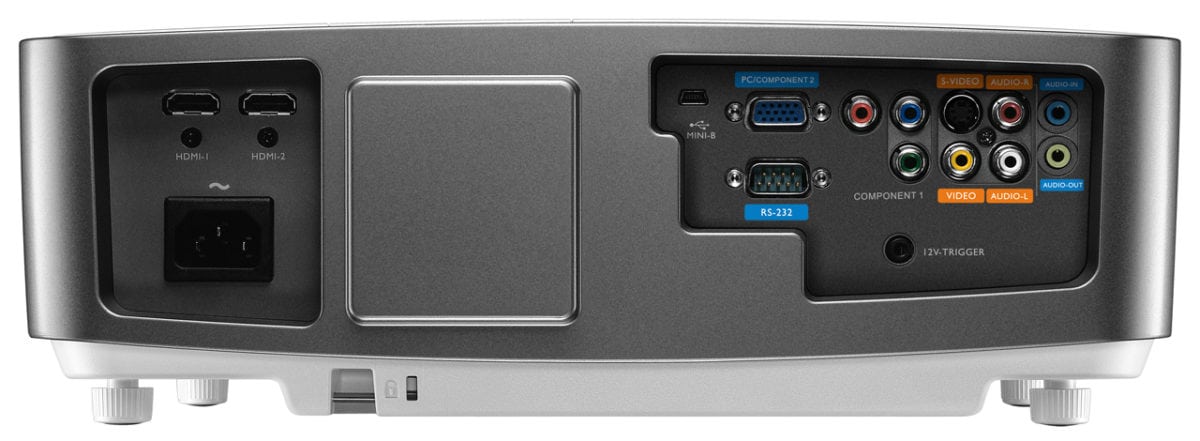
The rest of the action is on the back of the W1500, where we'll find all the inputs and connectors.

BenQ W1500 Control Panel

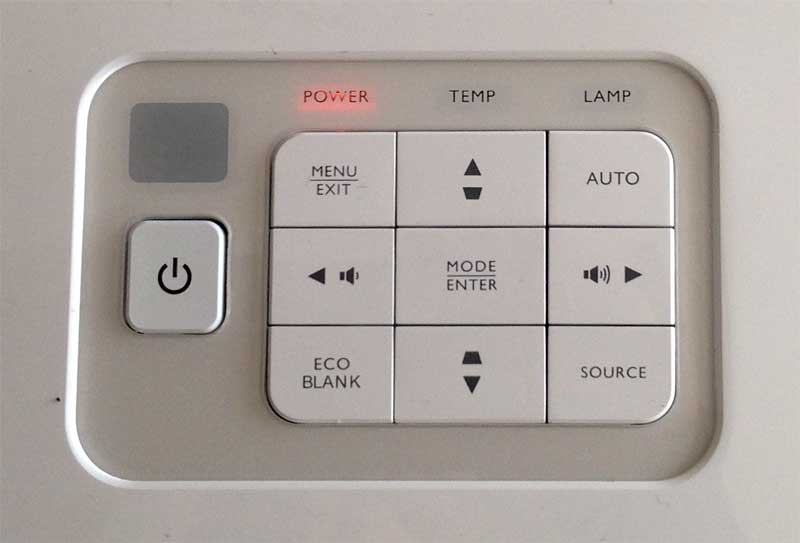
The BenQ projector's control panel is located on the top of the W1500.  It is pretty standard stuff.  The power switch is off to the left of the main navigation.  Just "above" the power switch, is the top IR sensor for the remote control.

There are three indicator lights, or actually words that light up as needed.  They are, as is typical, for Power (blinks during power up / down), Temperature, and Lamp.

Then comes the main control panel.  It consists of nine buttons, with the four navigation arrows located in a diamond formation.

The Menu button is top left, and doubles as the Exit (the menus) button, which moves you back up a level from the sub-menus.  Moving to the right finds the up arrow button top middle, and as you can see from the icons, when not in the menus, that top center button works to adjust keystone correction (as does the bottom middle button).  Of course, we recommend avoiding using keystone correction if you can, as it softens the image.

On the top right is the Auto button for locking on to an analog computer input.

The left and right arrow keys are on the second row.  When not navigating in the menus, those two buttons double as volume up, and volume down.  In between them is the center button which functions as Enter when navigating, and Mode selection when not.

The bottom row has Eco/Blank, to blank out the screen, then comes the down arrow, and on the right, the Source selection button.  And that's it folks, for the control panel.  We'll look at the remote control a bit later in this section.

Click Image to Enlarge

W1500 Lens Shift Control

Having vertical lens shift on a projector is a real bonus.  If you don't have it, and you are ceiling mounting, basically your projector has to be precisely at one height relative to the top of the screen or your image isn't rectangular.  Or if you are placing on a table, then there's only one height relative to the bottom of your screen, or again, you end up with a trapezoidal image.

The more lens shift range, the more placement flexibility in terms of height.

Well, the BenQ W1500 projector has adjustable vertical lens shift.  The amount of shift that the W1500 offers is rather limited, especially compared to competing LCD projectors.  It's simply easier with the design of 3 chip projectors to build in a lot of lens shift.  Almost no under $1500 DLP projectors offer any vertical lens shift, except for BenQ's own W1070.   We'll go through the amount of shift available on the last page  in this Hardware Tour section.

The BenQ W1500 projector may have some vertical lens shift, which we consider a real plus, but it lacks horizontal lens shift (which we consider less crucial).  Horizontal lens shift mostly comes into play when you can't mount your projector straight back from the center of your screen (center in terms of left / right).

Bottom line:  It's great that it has some lens shift, but there's not enough there, to accomplish what some other projectors can.  For example, if you had a 12 foot ceiling, you would probably have to hang the BenQ down a 3-4 foot poll to be at the right height for your screen, but with some projectors with a lot more lens shift (Epson 4030, 5030UB, Panasonic PT-AE8000U, AR100U, etc.), the projector could be mounted almost flush with the ceiling, rather than hanging down.


Click Image to Enlarge

BenQ W1500 Projector - Inputs and Connectors

All the BenQ connections are located on the back of the W1500.   Let's see what's there, starting from the far left:

The far left contains only the two HDMI 1.4 inputs, and below them, the normal, standard (US) three prong power receptacle.  Then there's a large space, and after that, the rest of the connectors:

In that section, from the left, first is a USB port for service, that's followed by a standard DB15 connector for the usual analog computer input, or it can double as a second component video input. Below it, is a DB9 connector - a serial port for traditional command and control (controlling the computer from a room control system).

Next over from the analog computer input, are three color coded RCA jacks for the primary Component Video input.  That's followed by a DIN connector for S-Video, and right below it,  another RCA jack, this time for composite video.  Next over is one pair of audio inputs (two RCA jacks) and on the far right is a second stereo audio input, this time using a stereo mini jack.  Finally, below it, is an Audio output, which I talk about elsewhere - it allows you to add a powered subwoofer, or feed a larger sound system.

That just about covers the input panel.  I should note that there are two screw thread adjustable rear feet, down below.  Also on the back, near the bottom are a Kensington lock slot, and a security bar, both are anti-theft features.

Wait, I almost forgot one item.  There's also a 12 volt screen trigger jack on the back, for those who wish to control a (suitably equipped) motorized screen.  With that set up correctly, turning on the projector would automatically lower your screen, while turning it off, would roll it back up.


© 2024 Projector Reviews

crossmenu linkedin facebook pinterest youtube rss twitter instagram facebook-blank rss-blank linkedin-blank pinterest youtube twitter instagram