I was excited when Art mentioned that he would be reviewing the BenQ HT9060. Back in September of 2019 in the days leading up to CEDIA I co-hosted an ISF session with Joel Silver and BenQ was generous enough to loan us an HT9060 for the class. Joel and I were only able to tinker with it for a short time during the class, but we both noticed that it had a great menu for us geeks to dive deep into. Once Art mentioned that we would be working with one I couldn’t wait to get my hands on it and really spend some time getting to know it.
Out of the box performance was not too uncommon for what I typically see. The greyscale was too green, actually leaning more towards cyan and the color gamut was way too big for SDR content. The factory mode is called “Bright” and is similar to other torch modes like “Vivid” or “Standard” that are found in flat panel displays. These modes are always set to the extreme for maximum brightness which ends up ruining the picture. This is one of the main driving factors to calibrate the system!
The HT9060 has 6 total picture modes. The out of the box mode is called “Bright”. The other modes are called “Vivid”, “Cinema”, “Silence”, “User 1”, and “User 2”. Both User modes had all of the necessary controls to dial the projector in so I decided that I would calibrate “User 1”.
[sam_pro id=1_35 codes=“true"]
There are three lamp modes to choose from in the HT9060; “Normal”, “Economic”, and “Smart Eco”. I used a 100IRE test pattern in the User 1 picture mode and took measurements while switching between each lamp mode. Normal measuring at 46.8ftL was 40% brighter than Economic measuring at 33.3ftL. Smart Eco measured the same as Normal, but I suspect that Smart Eco is a dynamic adjustment that changes as the content changes. This would explain why the measurements were the same as I was measuring a static test pattern. The fan noise was audibly quieter in Economic but the trade-off is 40% of the light output.
Contrast is set at 50 from the factory in the User 1 picture mode. This caused a major clipping error in the white levels. To eliminate the clipping I had to turn the contrast down all the way to 38. This, unfortunately, cost almost 40% of the light output of the projector. Luckily there is some headroom in the white levels, so in order to gain some light back, I turned the contrast back up to 46. Light output was way up, almost gaining back the full 40%. All of the white levels in the legal video range were still visible. The only sacrifice is the occasional extreme flash of white, perhaps a camera flash off of a white football jersey that exists above “legal” white for video content.
Setting the gamma was straight forward with the well-labeled labels of 2.2, 2.4, 2.5, 2.6. Although these gamma settings are clearly labeled I always measure to confirm that the label is correct. It is not uncommon to find that the labels aren’t quite right and this was the case with the HT9060. In a dark, dedicated viewing environment the typical gamma target is 2.4 for SDR content. The HT9060 did not track at 2.4, but it got close at 2.36 using the 2.6 setting. The 2.2 label was closer to 2.0, the 2.4 setting measured 2.18, and the 2.5 setting measured 2.28. Since this room is dark I went with 2.6.
[sam_pro id=1_47codes=“true"]
Sharpness set at 10 from the factory caused a ton of ringing and edge enhancement. 8 was the correct setting, and anything below that made things too soft.
When adjusting the grayscale the HT9060 provides a 2pt system. I had to calibrate the grayscale twice as the first attempt left too much green in the middle of the greyscale. The middle is the worst place to make an error and green is the worst color to have too much of. These are the 2 things that our eyes are most sensitive to and these errors are visible in content. After experimenting with different pairs of test patterns I had the best results by using 70IRE and 20IRE patterns. After calibrating the greyscale the delta errors were all under 2 while some levels were under a very respectable delta error of 1.
Color Temperature over IRE Range (after calibration)
*NOTE: I had to move the HT9060’s menu for white balance and CMS adjustments. The menu is in the middle of the screen which makes these adjustments impossible. I chose to move the menu to the lower-left corner of the screen where it didn’t affect my readings.
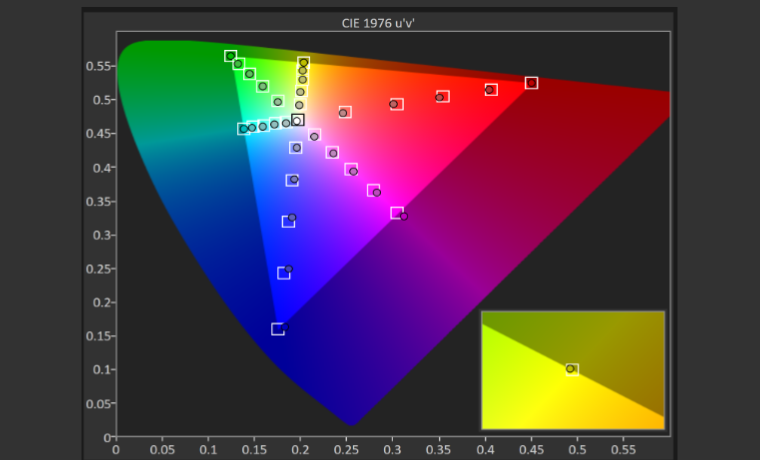
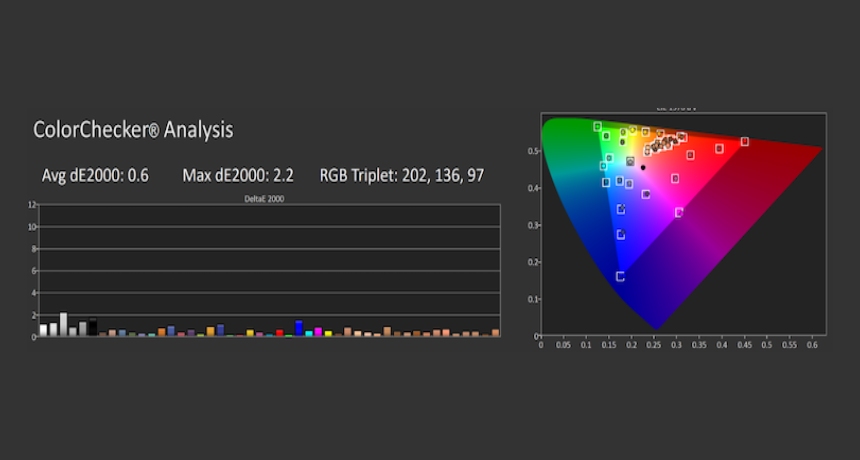
The HT9060 has a thorough CMS menu with all of the 18 necessary controls to dial in the color gamut. The settings are clearly and logically labeled and they work as intended. The factory CMS settings were pretty accurate out of the box. The largest delta error was with blue at a 2.8. The goal is to be under the perceivable target of 3, so in this case it was not really necessary to use the CMS other than to see how perfect I can make it. After only a few minutes of calibrating the color gamut the blue delta error was down from 2.8 to 1.2, and the rest of the colors were all under 1.
During the final check of the SDR performance I noticed that the White Level test pattern had a noticeable tint of blue, but turning the contrast down 1 click eliminated this color shift. The fully calibrated User 1 mode for SDR produced great results with a reasonably linear grayscale, flat gamma, near perfect color gamut, and produced a bright image at 35ftL.


