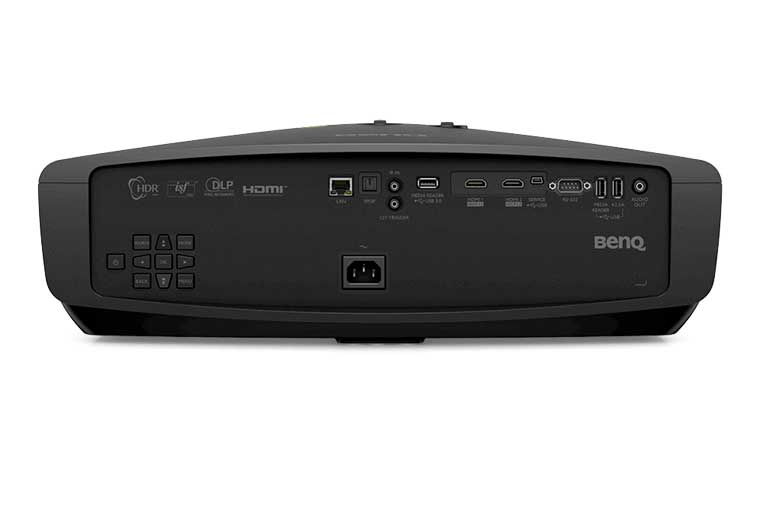
All of your cables, etc. will get plugged into the back input panel of the projector. It is located to the right of the Control panel. The HT5550 is rather well equipped. Let’s tour the back, starting (as usual) on the left side.
The first thing you’ll see is a feature found mostly on more expensive home projectors – That is few projectors much under $2000 that are geared for home theater, have wired networking. The first jack here, though is a typical ethernet LAN connector!
Next is a very nice touch – a feature I’d like to see most home theater projectors offer, but very, very, few do: An Optical Digital input (SPDIF).
Next comes another fairly rare feature – a connector allowing the hard wiring of the remote control. Now normally there are two cases where this is a handy feature:
- When the remote control is normally too far away from the projector (more than 30 feet). – Now that is very rare in a home theater!
- Rear screen setup – In homes almost all projectors are set up to project forward onto a screen and we watch the reflected image. But If the projector is behind the screen (rear screens are translucent – they pass light through so you can see it on the front side). Still where people have the space behind the screen to make this work, the advantage is that rear screen setups are relatively unaffected by ambient light in the viewing room
Right below the IR connector is a 12 volt screen trigger which is normally used to…of course…lowers, or raises, a motorized screen when the projector powers on, and off
BenQ is staying current, because our next input over to the right is a USB 3.0 input functioning as a Media reader.
Next comes a pair of HDMIs. Both are HDMI 2.0 with HDCP 2.2 copy protection. That’s a good thing. Many competitors are providing two HDMi’s but only one 2.0, and the other a 1.4 to be backward compatible with some very old HDMI gear. (So far, my older Blu-ray players, etc. have all managed to work with HDMI 2.0, but I’m sure there’s gear out there that won’t.) Still, I think BenQ has it right – going with both inputs being HDMI 2.0. My only regret – as always – I would have loved to see a 3rd HDMI input. Very few projectors do that. I expect though, that a number of the new UST laser projectors for home will have 3. Why? Because the UST projectors basically have “sound bars” built in, so they don’t really need an AV receiver. And, if you don’t’ have an AV receiver, you’ll need some very smart switch boxes if you have 3 HDMI devices, such as: A 4K UHD Blu-ray player, a cable or satellite box, and a gaming system like PS4, PS5, Xbox…
Hey, we’re not done yet. After the HDMIs is a 2nd USB this time a mini-USB input as a Service port for things like firmware upgrades.
An RS232C is next – that’s the old school serial port for basic command and control from a computer or other devices.
Wait – next are two more USBs – for a total of 4! These two, are standard USB C style inputs, one as another media reader – but with the far more common USB connector at this time (since USB 3.0 is relatively new). The other one has 2.5 amps at 5Volts its there to provide power to other devices, perhaps a plug in Roku stick, and other streaming devices that need power, or (if not ceiling mounted) to recharge 3D glasses.
Our last connector on the row is a stereo audio output. This is important to have (some form of audio out) on projectors with Media player capability, or even just streaming from a device plugged in such as a smart 4K UHD Blu-ray player, that has Apps for Netflix, Amazon, etc.
This BenQ HT5550 is a dedicated home theater projector in theory, and most lack media players (hard to plug in a USB thumb drive when the projector is hanging from the ceiling well over your head) but streaming from another device, is practical even when mounted.
This way you can take that audio and feed it to a serious sound system! Let’s face it if you are trying to watch Blacklist from Netflix, it’s going to be a real drag without sound. Unfortunately BenQ only provides stereo audio out, and not a digital optical or other alternative that can output 5.1, 7.1 or other full surround sound data. (Too bad!)
Bottom line: A really good selection of inputs. As I stated, a 3rd HDMI would have been a real plus for those without an AV receiver. BTW, Comprehensive makes a very small HDMI splitter that is fully 4K capable, I use it in my theater, and also their HDMI splitter that let me split the incoming signal from my AV receiver or other source, into two HDMI outputs to do my side by side comparisons.


